Docker has become increasingly popular in today's development lifecycle, providing an automated way to package software and its dependencies into a standardized unit that can be shared across multiple platforms. For more information on the subject, I recommend a "detour" to the wide documentation of Docker.
With this article I want to take you by the hand and lead you to the construction of a Docker image of Liferay DXP installed on Red Hat JBoss EAP. Arm yourself with patience because the road will be a little long but I'm sure it will upon arrival you will be satisfied.
The article focuses on Liferay DXP version 7.2 and version 7.2 by Red Hat JBoss EAP. Some of you will know that October 13, 2020 was Liferay DXP version 7.3 released, and I'm sure you'll be pleased to know that I dedicated the last chapter to creating the image with the latter Liferay version installed on the latest version of JBoss EAP 7.3.
1. Liferay's standard Docker images
Liferay provides official Docker images for the following products. These pictures are freely available and published on the Docker Hub repository by Liferay. The related Docker image is available for each product release. The figure below shows the latest Liferay DXP version 7.3 Docker images.
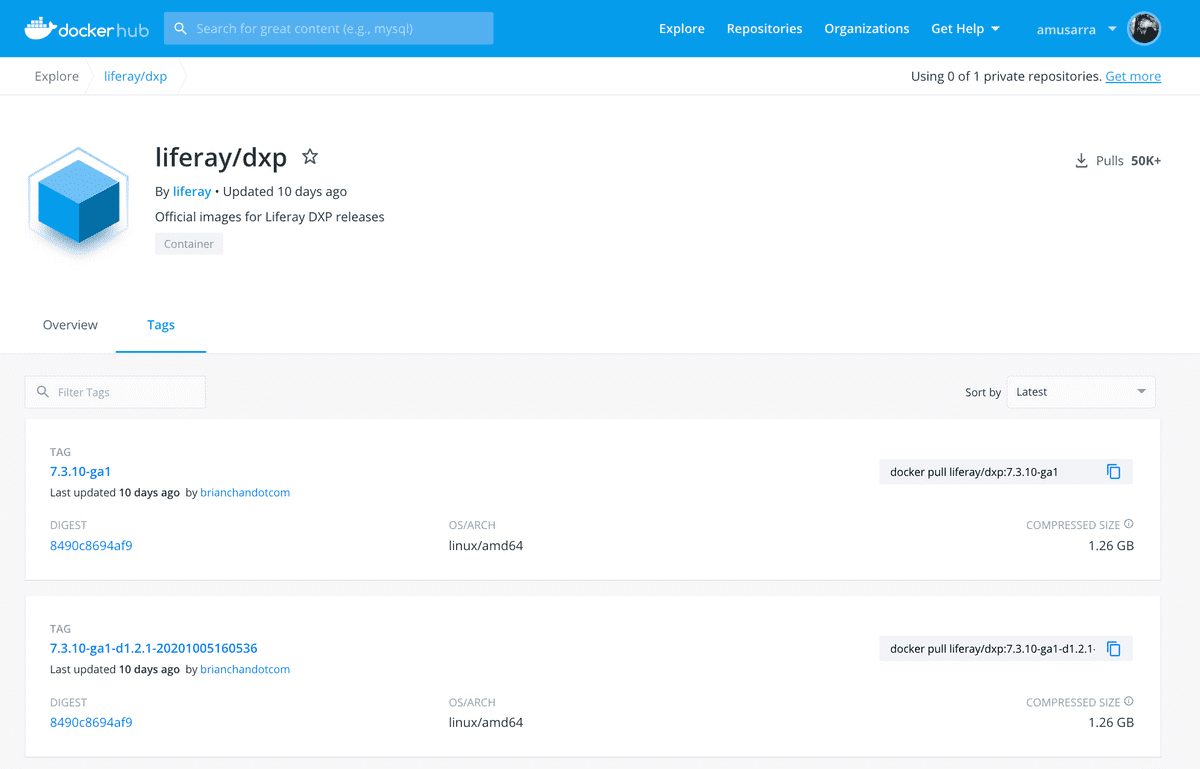
You can extract Liferay Docker images from the resources indicated in precedence and manage them independently. Liferay Workspace, however, it does provide an easy way to integrate Docker development into your own existing workflow with prepackaged Gradle activities or tasks.
Thanks to the Liferay Workspace we can perform the following activities.
- Creating a Docker container based on a standard image provided via Docker Hub.
- Container configuration.
- Interact with the container.
- Creating a custom Liferay image.
All detailed information is available on the official documentation by Liferay Leveraging Docker. The next paragraphs briefly describe how the images are organized produced by Liferay.
1.1. Tags
The tags follow the format {version}-{data}. Version indicates the version of Liferay DXP and date indicates the date the Docker image was created. The tags following the {version} format always point to the last tag following the format {version}-{date}.
DXP images come with a 30 day trial license. Pictures older ones will be deleted regularly and new images will be available with a new 30-day trial license.
1.2. Runnings
To start Liferay DXP, replace {tag} and run the command
docker run -it -p 8080:8080 liferay/dxp:{tag}
The -it argument allows you to stop the container with the combination of
CTRL-C keys. Otherwise, you need to use the docker kill {containerId} command
(or other equivalent) to stop the container.
The argument -p 8080: 8080 maps container port 8080 to port 8080 of the host so that you can access Liferay DXP using a browser.
1.3. Evironment Variables
You can fine-tune the default JVM parameters by setting the variable LIFERAY_JVM_OPTS environment.
You can customize the behavior of Liferay DXP via environment variables that reference the configuration properties defined on the portal.properties file. For example, if you want to configure the Liferay instance for the English language only and Portuguese, you can use one of the following strategies:
- create the portal-ext.properties file with the entry
locales.enabled = en_US, pt_BR; - set the environment variable
LIFERAY_LOCALES_PERIOD_ENABLED = en_US, pt_BR.
Environment variables take precedence over portal.properties. The respective environment variable of each property is documented within the file portal.properties.
1.4. File System
To quickly test your changes without creating a new image, map the host file system to container file system.
Start the container with the option -v $(pwd)/xyz123:/mnt/liferay to link
$(pwd)/xyz123 on the host OS to /mnt/liferay on the container. I remember
that PWD stands for Pathname Working Directory.
The files in the host directory $(pwd)/xyz123/files are also available in the
container directory /mnt/liferay/files and will be copied to /opt/liferay
before starting Liferay DXP.
For example, if you want to edit Apache Tomcat setenv.sh file, enter these
changes in $(pwd)/xyz123/files/tomcat/bin/setenv.sh, thus the file setenv.sh
will be overwritten in /opt/liferay/tomcat/bin/setenv.sh first starting
Liferay DXP.
1.5. Scripts
All scripts in the container directory /mnt/liferay/scripts will come run
before starting Liferay DXP. For example, it is possible to install scripts that
clean up cache directories before the portal goes up. Place your scripts in
$(pwd)/xyz123/scripts.
1.6. Deploy
Copy the files to $(pwd)/xyz123/deploy on the host OS to install modules
(or bundles) on Liferay DXP at runtime. The directory can be used to install
the license file, which is required to be able to use the product.
2. Extension of the liferay-docker project
Liferay produces its own official Docker images via the published project on GitHub which is called liferay-docker, project not very popular with the general public. The images produced are though exclusively created from the bundle with Apache Tomcat.
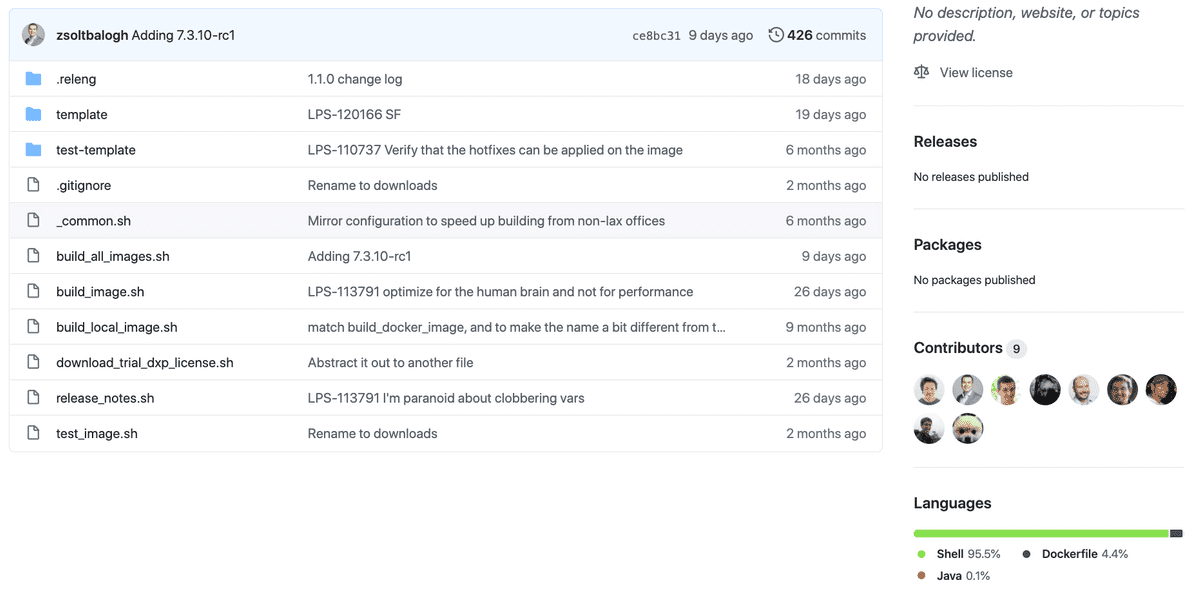
Instead, the need is to create a Docker image where Liferay is installed on JBoss EAP. However, it is advisable to create the new image while keeping the "services offered" from the official images produced by Liferay (see: file system, environment variables, support for running pre-start scripts, etc.).
To achieve this, it is enough to extend the liferay-docker project so that it is possible:
- build the Docker image where Liferay is installed on JBoss EAP;
- push the Docker image created to a repository;
- install the Liferay Patching Tool, Fix Pack, Hot Fix and Security Fix Pack directly during the build phase;
- run the JBoss EAP Patch installation.
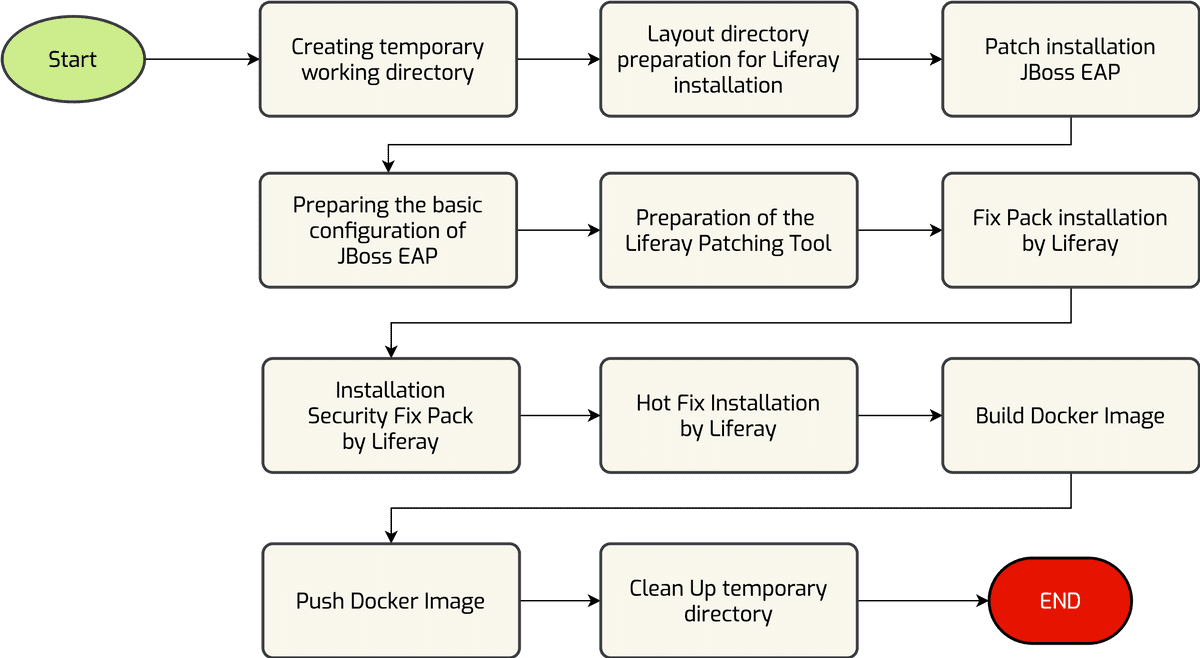
The object of the extension is the build_local_image.sh script. This is responsible the execution of the operations indicated above, of which the last are optional. The diagram shown in the following figure illustrates the various stages of the Liferay Docker image building process.
The creation of the Docker image follows the Liferay installation process on JBoss EAP as described by the official Liferay document called Installing on JBoss EAP.
3. Requirements
So that you can successfully complete the image creation Docker, a number of software requirements must be met for the machine dedicated to the build operation. The software requirements to be met are the following.
- Unix/Linux/macOS Operating System. Alternatively, a Bash shell (version 3.x) is sufficient.
- Docker Engine 18.x or 19.x.
- Git 2.x (optional).
- JDK 1.8 0 11.
As for Docker, you can install Docker Desktop on your own workstation, available for both Microsoft operating systems and Apple operating systems. I recommend installing the stable version avoiding the edge version, the latter useful for experimenting with the latest features.
If you have already installed Docker, check the version on your system using the
docker version command making sure the version is in range indicated by the
requirements. An example of the command output is shown below. In this case the
version is 19.03.13, therefore in line with what is requested.
Client: Docker Engine - Community
 Cloud integration  0.1.18
 Version:           19.03.13
 API version:       1.40
 Go version:        go1.13.15
 Git commit:        4484c46d9d
 Built:             Wed Sep 16 16:58:31 2020
 OS/Arch:           darwin/amd64
 Experimental:      false

Server: Docker Engine - Community
 Engine:
  Version:          19.03.13
  API version:      1.40 (minimum version 1.12)
  Go version:       go1.13.15
  Git commit:       4484c46d9d
  Built:            Wed Sep 16 17:07:04 2020
  OS/Arch:          linux/amd64
  Experimental:     false
 containerd:
  Version:          v1.3.7
  GitCommit:        8fba4e9a7d01810a393d5d25a3621dc101981175
 runc:
  Version:          1.0.0-rc10
  GitCommit:        dc9208a3303feef5b3839f4323d9beb36df0a9dd
 docker-init:
  Version:          0.18.0
GitCommit: fec3683The software needed to create the image can be downloaded as an archive liferay-docker-1.0.0.zip.
4. Dependency downloads
The image creation process requires the following to be available bundle.
- Liferay DXP WAR
- Liferay DXP Dependencies
- Liferay DXP OSGi Dependencies
- Liferay Patching Tool
- Liferay DXP Fix Pack (optional)
- Liferay DXP Hot Fix (optional)
- Liferay DXP Security Pack (optional)
- Red Hat JBoss EAP
- Red Hat JBoss EAP Patch (optional)
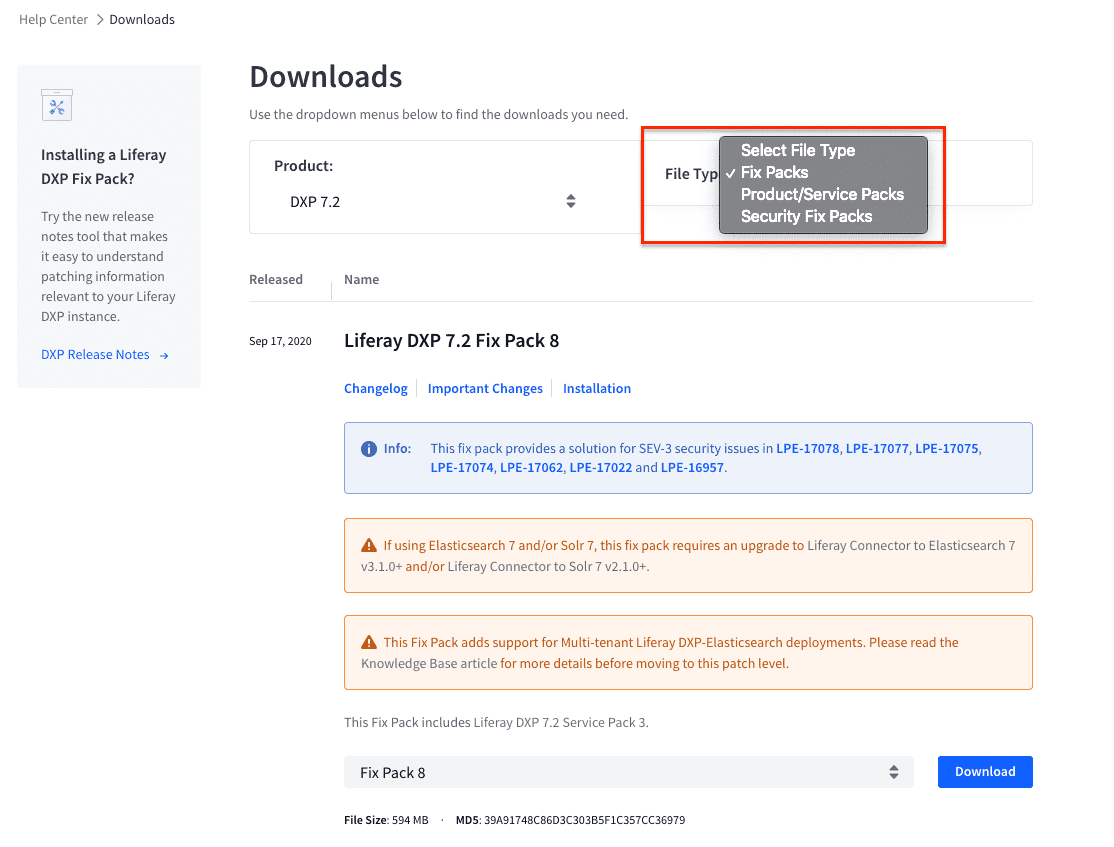
The first five bundles listed are for Liferay and these must be downloaded from the Liferay Customer Portal, is therefore required an account that is enabled to access and download.
Bundles covering, Fix Pack, Hot Fix and Liferay Security Pack are optional, necessary in case you want to apply Docker image build phase Liferay a specific Fix Pack, Hot Fix or Security Pack. The figure below shows the download section of the Liferay Customer Portal.
As for the JBoss EAP bundle, this can be downloaded in GA version and any patches from the RedHat Customer Portal.
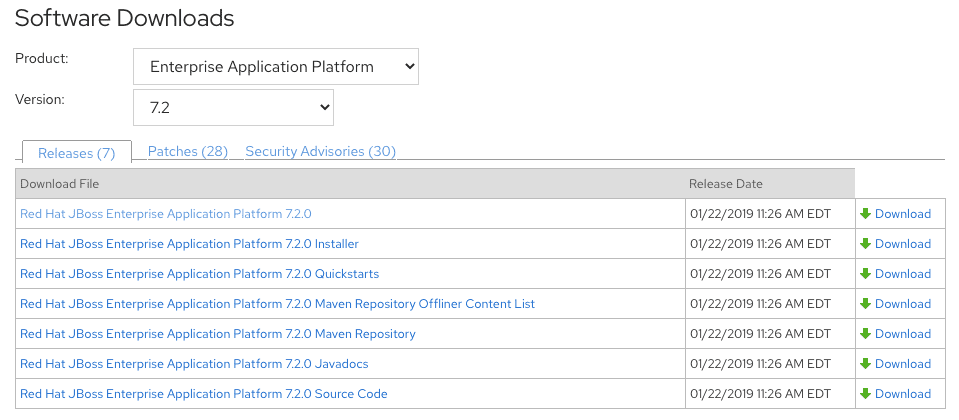
For this article, the reference version of Liferay is DXP 7.2 SP 3 and that of RedHat JBoss is 7.2. The table below shows in detail the list of required dependencies (and not the optional ones indicated in the previous list).
| Artifact Name | File Name | Version | Source |
|---|---|---|---|
| Liferay DXP WAR | liferay-dxp-7.2.10.3-sp3-202009100727.war | 7.2.10 SP 3 | Liferay Customer Portal |
| Liferay DXP Dependencies | liferay-dxp-dependencies-7.2.10.3-sp3-202009100727.zip | 7.2.10 SP 3 | Liferay Customer Portal |
| Liferay DXP OSGi Dependencies | liferay-dxp-osgi-7.2.10.3-sp3-202009100727.zip | 7.2.10 SP 3 | Liferay Customer Portal |
| Liferay Patching Tool | patching-tool-2.0.15.zip | 7.2.10 SP 3 | Liferay Customer Portal |
| RedHat JBoss EAP | jboss-eap-7.2.0.zip | 7.2.0 GA | RedHat Customer Portal |
5. How to create the image
To create the Docker image you need to install the project extension liferay-docker on the dedicated machine to the build process. It is also essential that you have downloaded the bundles indicated in Table 1.
The basic steps to proceed with the creation of the image are:
- installation of the liferay-docker project extension;
- preparation of the directory that will contain the bundles of Table 1;
- run the build_local_image.sh script.
The build_local_image.sh script that starts the image creation process Docker Liferay + JBoss EAP, must be run by specifying the following parameters:
- the relative path that contains the bundles of Table 1;
- the name of the Docker image/repository;
- the name of the tag to be assigned to the image;
- flag that indicates whether to push the image to the Docker repository (no-push | push);
- name of the application server, whose value in this case is jboss-eap.
By running the script without providing any parameters, the modes will be shown use of the command (see figure below). Remember that the script remains valid to perform Liferay imaging based on the Apache Tomcat bundle of Liferay.

Console 2 shows the sequence of commands needed to complete with successful creation of Liferay Docker image installed on JBoss EAP. The image creation process may take several minutes (between 6 and 8 minutes on CPU: i7 10th generation 1 Socket 2 Core, RAM: 16GB, Storage SSD).
# 1. Unzip of the liferay-docker project extension
$ unzip ~/Downloads/liferay-docker-1.0.0.zip

# 2. Preparing the directory that will contain the bundles
$ cd liferay-docker-1.0.0
$ cp -a ~/Downloads/bundles .

# 3. Running the image build process
$ ./build_local_image.sh bundles amusarra/liferay-dxp liferay-dxp-7.2.10-sp3 no-push jboss-eapWhen the build_local_image.sh script finishes running, using the command docker images
you can check the new image just created (see figure below).

As you can see from what is shown in the figure, two tags have been created that reflect the pattern indicated in 1.1. Tags that point to the same image (see image id). The Docker image created is ready to be used.
5.1. JBoss EAP configuration template
JBoss EAP, on which Liferay was installed, received the configuration base defined on the Installing on JBoss EAP document. The basic JBoss EAP configuration files are available within the $PROJECT_DIR/template/jboss-eap directory, as shown in the figure following.
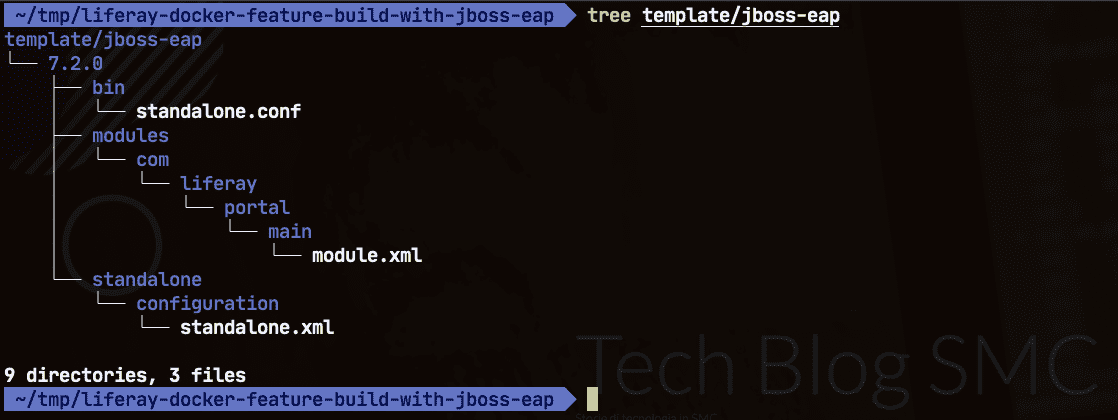
The basic configuration of JBoss EAP can possibly be changed according to your needs, doing so already in the image creation phase is it is possible to apply customizations to the basic configuration.
It is recommended to apply customizations to the JBoss EAP configuration via the container configuration (see 1.3. Evironment Variables and 1.4. File System).
5.2. Patching Tool Installation
In case you want to install the Liferay Patching Tool on the image to create, just download from the Liferay Customer Portal the latest version of the Patching Tool (for example: patching-tool-2.0.15.zip), and place the zip file inside the directory containing the rest of the bundles indicated in Table 1.
When creating the image, if the Patching Tool is present, this will be installed inside the so-called LIFERAY_HOME (see figure below).

The operation of is performed during the installation of the Patching Tool auto-discovery which as a consequence will create the default.properties file inside of the Patching Tool home directory.
For more information about installing and using this tool, refer to the official Liferay document which is called Installing the Patching Tool.
Note: When creating a new image it is recommended to always start from the latest available version of the Liferay bundles. The installation of the Patching Tool is essential for creating an image to apply the latest Fix Pack, Hot Fix or Security Fix released by Liferay. The application fixes can also be performed after image creation, for example, when a Liferay container is created.
5.3. Liferay Fix Pack installation
When creating the image, you can apply the released Fix Packs from Liferay. Before you can install the Fix Pack it is essential that you have installed the Patching Tool (see 5.2. Patching Tool Installation).
Note: When deciding to install a Fix Pack it is essential to make sure that the version of the Patching Tool installed is compatible with the Fix Pack wants to install. This information can be found on the download section of the Fix Pack itself.
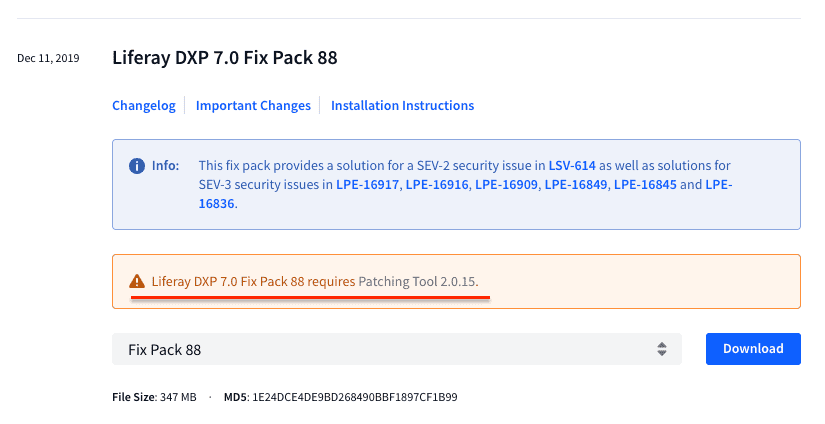
To activate the installation of the Fix Pack during image creation, you need to download the Fix Pack from the Liferay Customer Portal and place the zip file inside the directory containing the rest of the bundles indicated in Table 1.
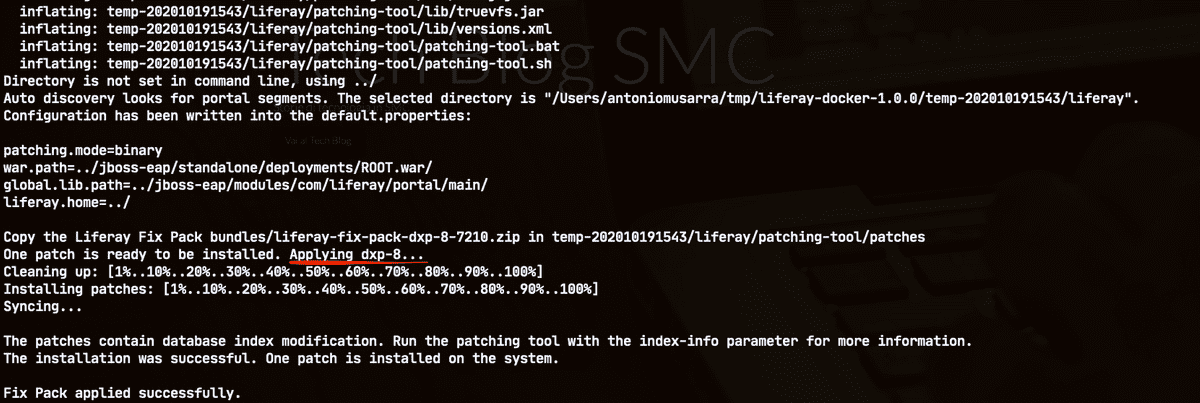
The figure below shows the installation of the Fix Pack starting immediately afterwards the installation of the Patching Tool, and in this case it is the Fix Pack liferay-fix-pack-dxp-8-7210.zip on Liferay 7.2 DXP SP 2 version.
5.4. Liferay Hotfix and Security Fix Pack installation
As with the installation of the Fix Pack, also Hotfix and Security Fix Pack follow the same installation procedure. To activate the installation in phase to create the image, it is necessary to download the relative zip files from the Customer Portal of Liferay and place them inside the directory containing the rest of the bundles indicated in Table 1.
5.5. JBoss EAP Patch Installation
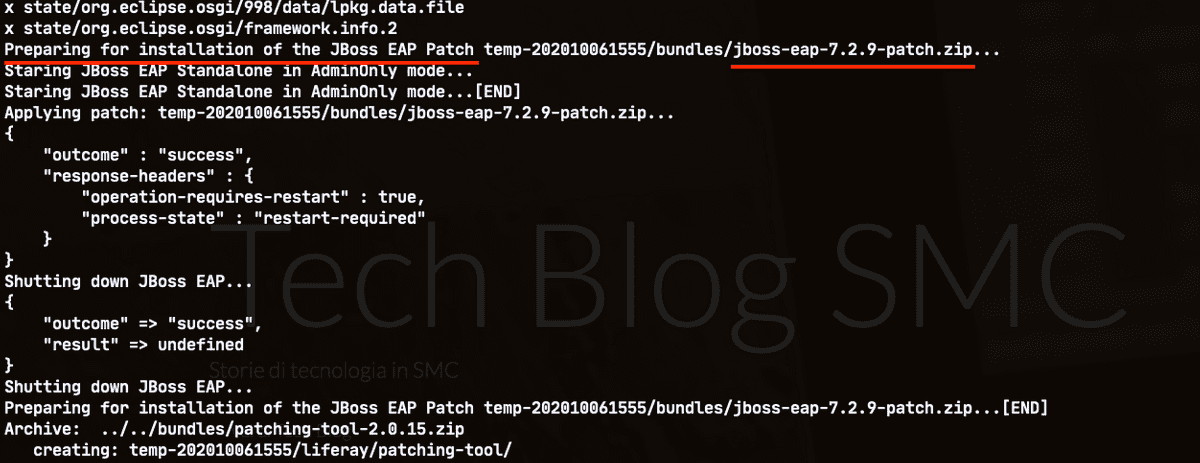
As with Liferay, so is JBoss EAP in the creation process Docker image, if the patch zip file is present, it will be applied. The figure below shows the patch being applied during the build process. In this case patch 7.2.9 has been applied, which means that the new JBoss EAP version will be 7.2.9.
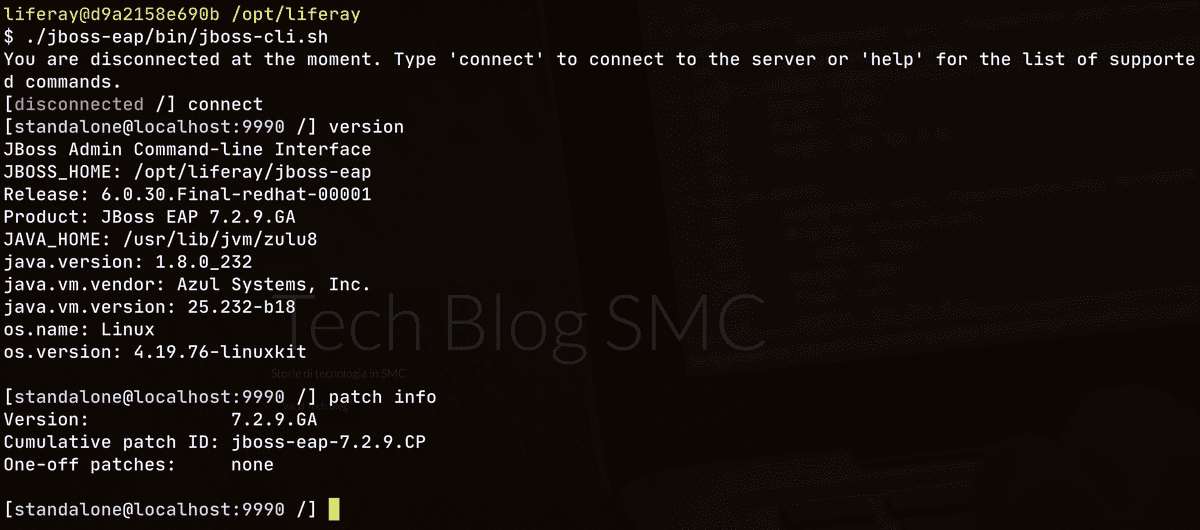
When the Liferay instance is up, you can check the JBoss EAP version from the application server logs themselves or using the version and patch info directly from the JBoss EAP CLI. The figure below shows the check the version of JBoss EAP, which after applying the patch is passed from 7.2.0 to 7.2.9.
6. Run the Docker Liferay DXP + JBoss EAP image
To launch Liferay's new Docker image, you can use commands Docker standard. Console 3 shows some of the standard commands for start the new image.
# Starting amusarra/liferay-dxp:liferay-dxp-7.2.10-sp3 image in interactive mode by exposing HTTP port 8080
$ docker run -it -p 8080:8080 -P amusarra/liferay-dxp:liferay-dxp-7.2.10-sp3

# Starting amusarra/liferay-dxp:liferay-dxp-7.2.10-sp3 image in detached mode by exposing
# ports 8000 (DEBUG), 8080 (HTTP) and 11311 (Gogo Shell)
$ docker run -d -p 8000:8000 -p 8080:8080 -p 11311:11311 -P amusarra/liferay-dxp:liferay-dxp-7.2.10-sp3

# Starting amusarra/liferay-dxp:liferay-dxp-7.2.10-sp3 image in detached mode by exposing
# ports 8000 (DEBUG), 8080 (HTTP) and 11311 (Gogo Shell) and giving the container a name
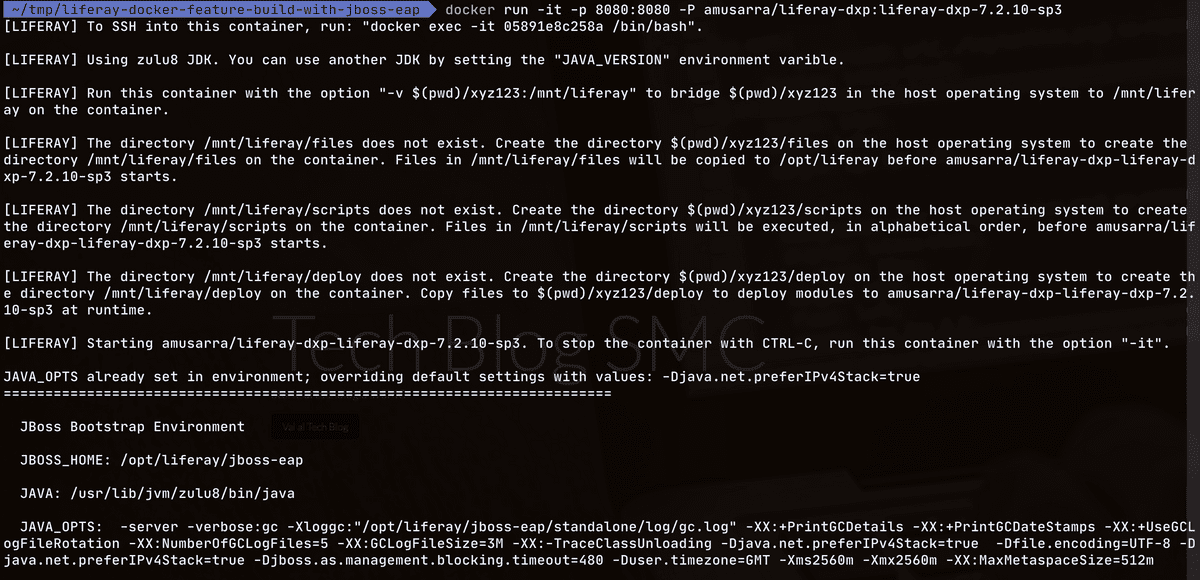
$ docker run -d --name liferay72jboss -p 8000:8000 -p 8080:8080 -p 11311:11311 -P amusarra:liferay-dxp-7.2.10-sp3When the image is started you can see the following information that are shown in detail in the figure below:
- how to get the console of the newly created container;
- the version of JAVA used to start Liferay;
- the situation on the file system on which it is possible to act through the use of the Docker Volume.
6.1. Use Docker Volume
To act on the configuration of Liferay and JBoss EAP, thus avoiding the creating new images, you can take advantage of the so-called Docker Volumes by mounting the file system local on the container in execution, as indicated in chapter 1.4. File System.
In case you for example wanted to configure Liferay to use Oracle as RDBMS, the procedure to follow is as follows:
prepare the file system layout as required by the standard Liferay images (see File System);
review the JBoss EAP configuration:
- modify the module.xml configuration file to add the reference to the RDBMS driver, which in this case is Oracle;
- copy the Oracle JDBC driver to the JBoss EAP installation;
add the connection configuration to the database through the portal-ext.properties properties file or through the environment.
Console 4 shows the commands for creating the file system layout that will contain the configuration files needed to connect Liferay to the Oracle database.
# 1. Prepare the file system layout
$ mkdir liferay-with-jboss-docker-configuration
$ cd liferay-with-jboss-docker-configuration
$ mkdir deploy && mkdir scripts && mkdir files

# 2. Copy the revised module.xml file with reference to the Oracle JDBC driver
$ mkdir -p files/jboss-eap/modules/com/liferay/portal/main/
$ cp ~/Downloads/module.xml files/jboss-eap/modules/com/liferay/portal/main/

# 3. Copy the Oracle JDBC driver
$ cp ~/Downloads/ojdbc8.jar files/jboss-eap/modules/com/liferay/portal/main/

# 4. Copy of the portal-ext.properties file with the connection configuration to the Oracle database
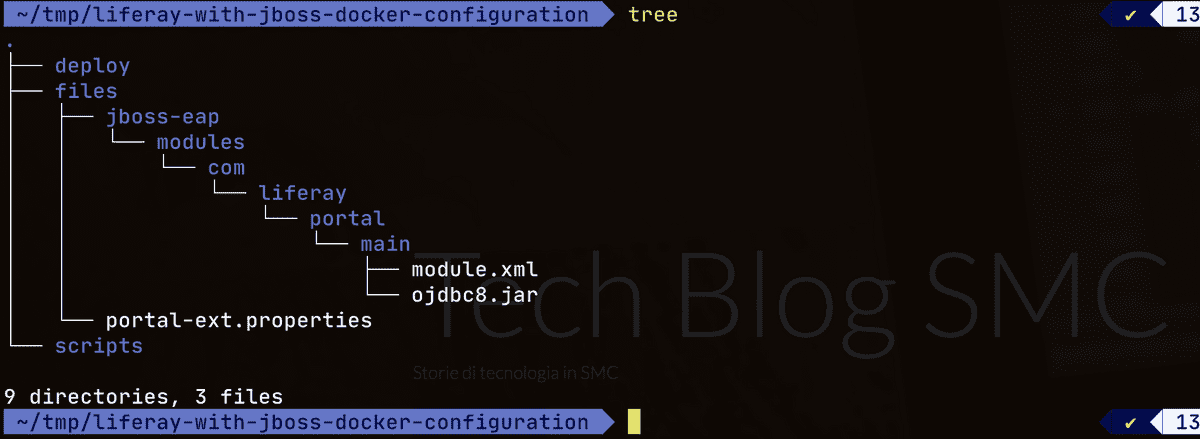
$ cp ~/Downloads/portal-ext.properties files/The figure below shows the structure of the newly created file system and what it will be mounted as Docker Volume, as indicated by the command shown in Console 5. Note that the deploy and directories are also part of the layout scripts, which are respectively dedicated to hot-deploy modules or bundles and running Liferay pre-start scripts.
# Running Liferay with the connection to the Oracle database
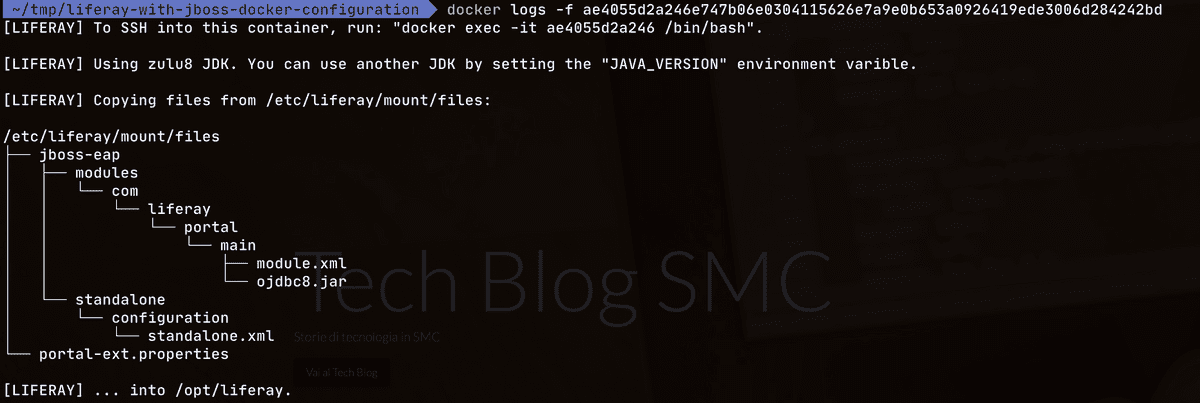
$ docker run -d --name liferay72jboss -p 8080:8080 -p 11311:11311 -v $(pwd):/etc/liferay/mount -P amusarra/liferay-dxp:liferay-dxp-7.2.10-sp3The figure below highlights the copying of the configuration files to the file system of the container that have been prepared previously.
6.2. Liferay Fix Pack installation
There is the possibility to install a Fix Pack during the start-up of the container. In chapter 5. How to create the image, we explained how install a Fix Pack during the image creation process.
Applying a Fix Pack on an existing image can be an advantage in if you want to easily check the "goodness" of the Fix Pack, especially in those cases where the control of any regressions on custom software.
The requirement for installing the Fix Pack in this way is presence of the Patching Tool installation on the base image to which it is intended apply the Fix Pack (see 5.2. Patching Tool Installation) and the configuration of the container using Docker Volumes (see 6.1. Using Docker Volume). The patching directory must then be added to the file system layout inside which to place the zip file of the Fix Pack. The figure below shows how the directory was added to the previous file system layout patching and added the Fix Pack file we want to install.
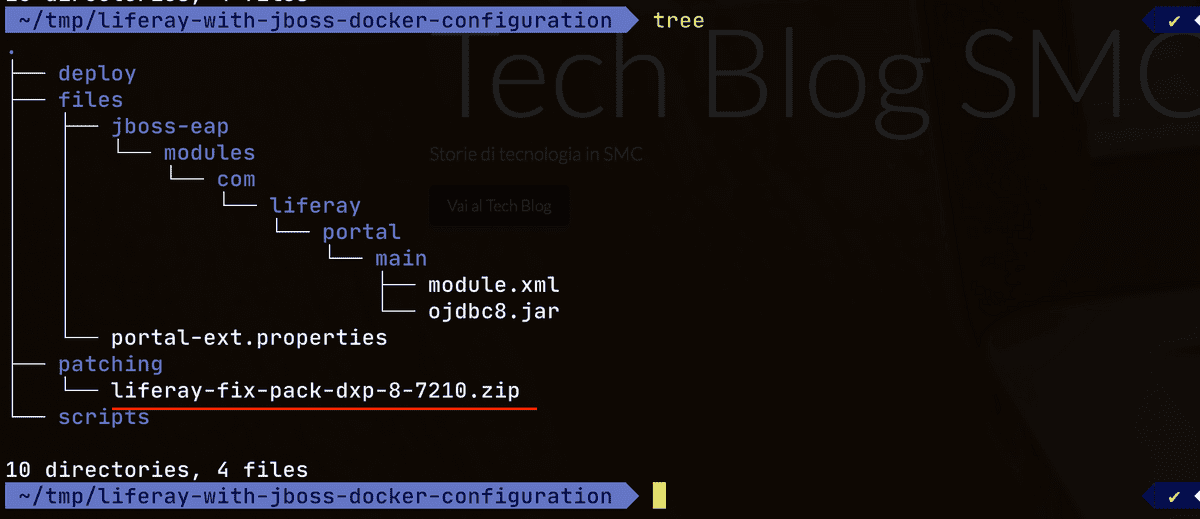
By running the command shown below, this time, in addition to applying the configuration for connection to Oracle, before Liferay is started, the Fix Pack residing inside the patching directory will be applied.
# Running Liferay with Fix Pack application
$ docker run -d --name liferay72jboss -p 8080:8080 -p 11311:11311 -v $(pwd):/etc/liferay/mount -P amusarra/liferay-dxp:liferay-dxp-7.2.10-fp-8From the Docker container start logs, you should see the application of the Fix Pack and then start the Liferay portal. The following figure it shows an example of application of the Fix Pack.
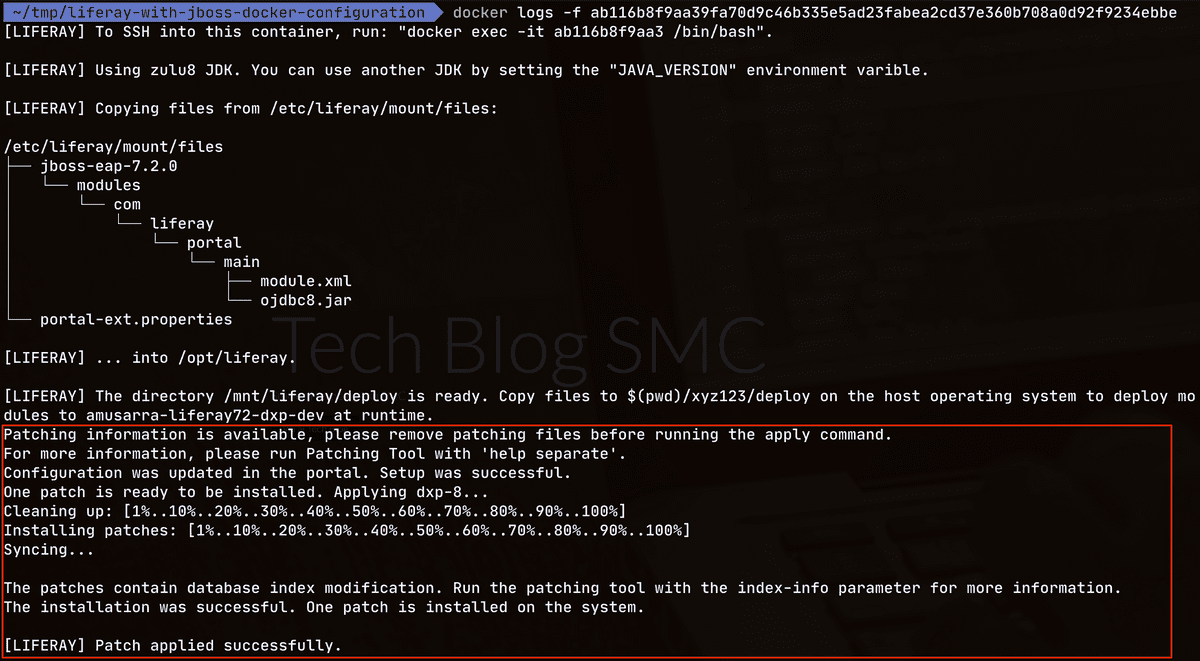
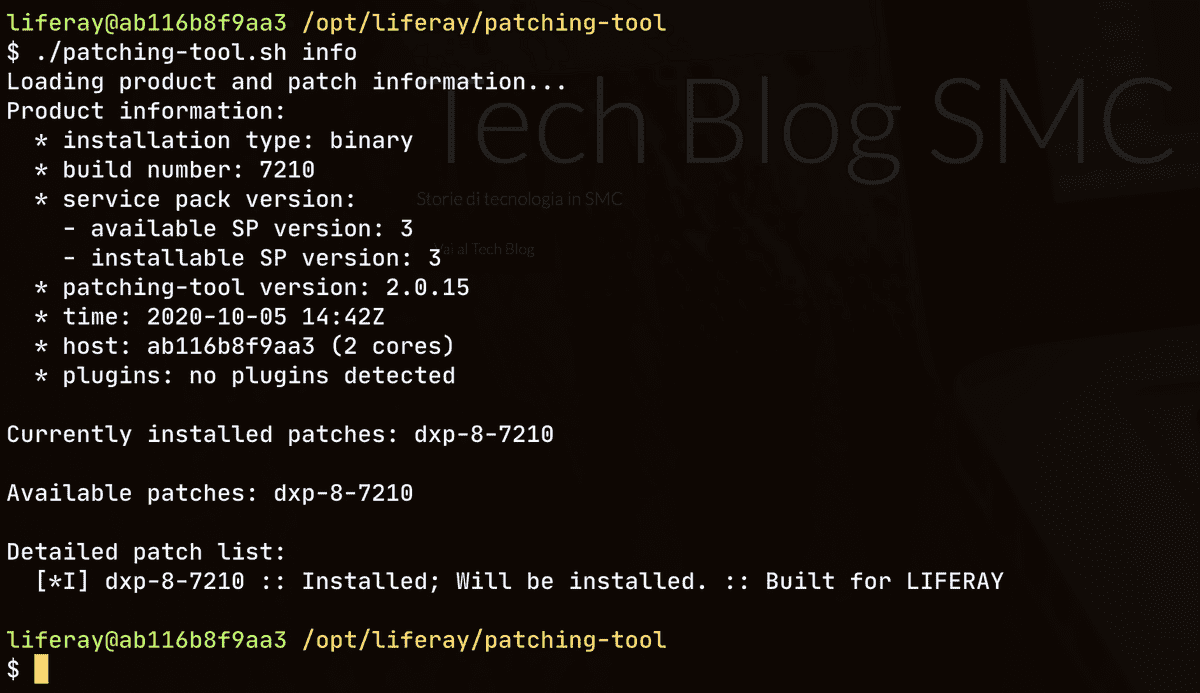
To make sure of the successful and correct installation of the Fix Pack, just
gain access to the machine and then use the ./patching-tool.sh info command
(from the Patching Tool installation directory) to verify that the Fix Pack
for which installation was requested is present on the system.
6.3 Liferay Hotfix and Security Fix Pack installation
In the same way as you can install the Liferay Fix Pack during the start-up of the container, it is also possible to do it for Hotfix and Security Fix Pack. The indications described in 5.3 remain valid. Liferay Fix Pack installation.
7. A real scenario
Keeping in mind what is described extensively in chapter 5. How to create image, we will see what are the steps to create your own Docker image Liferay + JBoss EAP, assuming the following scenario.
Let's say we want to build a Liferay DXP 7.2 SP 2 Docker image with JBoss EAP 7.2.0 as application server and want to apply the Liferay Fix Pack dxp-8-7210 and the patch 7.2.9 JBoss EAP. To obtain this result it is necessary proceed with the steps shown in the diagram shown below.
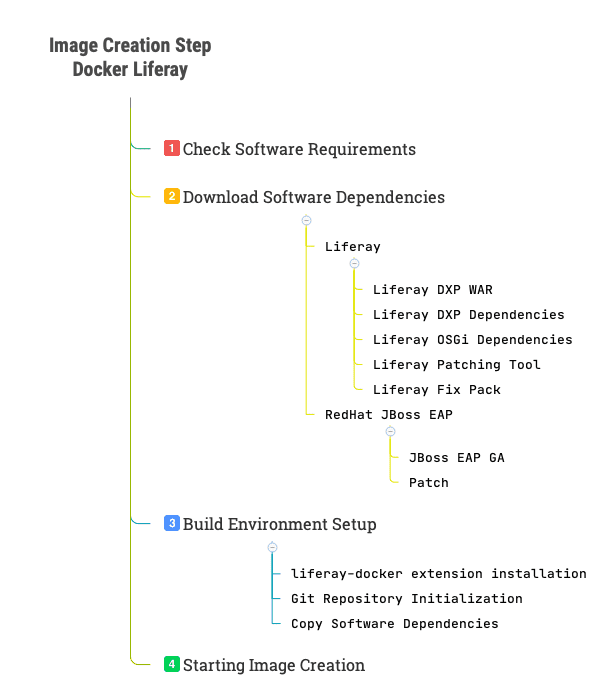
We assume that we have successfully performed the first step and the second step, for which I recommend to review chapters 3. Requirements and 4. Download dependencies. For the rest of the steps, execute the commands indicated in order from the console (Bash).
# Step 3.1 Installing the liferay-docker project extension
#  - The zip file of the project from the network via URL https://github.com/smclab/liferay-docker/archive/v1.0.0.zip
$ unzip ~/Downloads/liferay-docker-1.0.0.zip

# Step 3.2 Initializing the Git Repository
#  - Replace the Git repository URL with your own
#  - Give the branch a name that is possibly explanatory
$ cd liferay-docker-1.0.0
$ git init
$ git add .
$ git remote add origin https://github.com/smclab/liferay-docker.git
$ git commit -m "Initial import liferay-docker image builder"
$ git checkout -b build/liferay-dxp-7.2.10-fp-8

# Step 3.3 Preparing the directory that will contain the bundles
$ cp -a ~/Downloads/bundles .

# Step 4 Running the image build process
#  - specify the name of your repository (in this case replace amusarra/liferay-dxp)
#  - the version of the docker image tag should be as explanatory as possible.
#    In this case it is liferay-dxp-7.2.10-fp-8 which corresponds with the branch name
$ ./build_local_image.sh bundles amusarra/liferay-dxp liferay-dxp-7.2.10-fp-8 no-push jboss-eapAt the end of step 4, then the execution of the build_local_image.sh script,
using the docker images command you can verify the new image just created
(see figure below).

The execution of step 3.2 is completely optional for creation purposes Docker image. The advantage of initializing the build environment as Git repository, lies in the fact that once it is established that it works of the newly created image, after performing the commit and push operations, we can build the specific version at any time image.
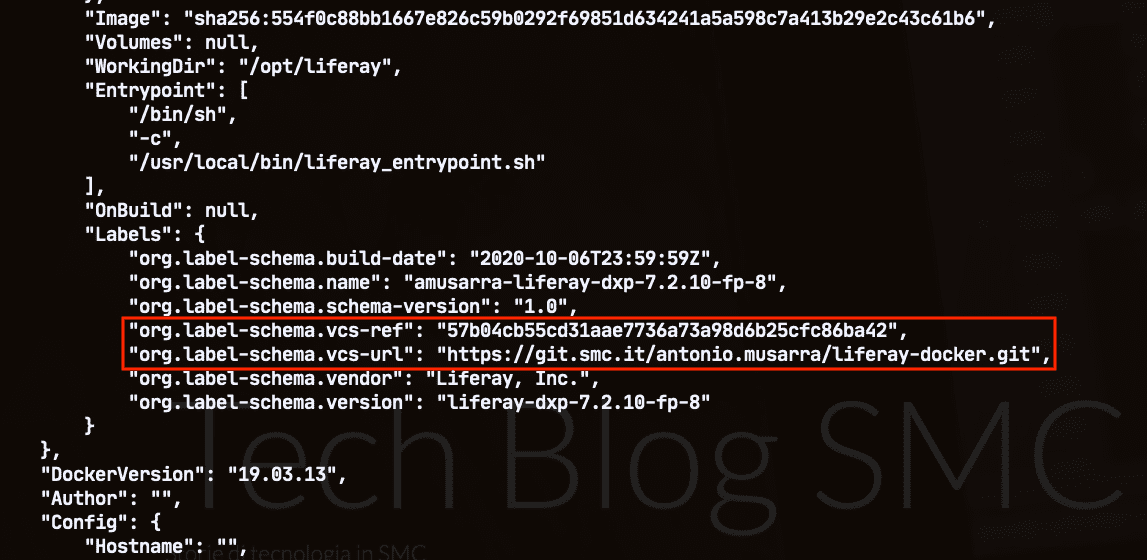
Another advantage of using Git for versioning of image creation it is
immediately evident when using the docker image inspect <imageid> command.
The Docker image labels report information about the commit hash and the
url of the repository, as shown in the figure below.
# Step 1 Clone of the liferay-docker repository and checkout of the version branch
#  - Replace the Git repository URL with your own
$ git clone -b build/liferay-dxp-7.2.10-fp-8 https://github.com/smclab/liferay-docker.git

# Step 2 Running the image build process
$ cd liferay-docker
$ ./build_local_image.sh bundles amusarra/liferay-dxp liferay-dxp-7.2.10-fp-8 no-push jboss-eapIn order to perform a verification of the newly created image, it is enough
run the docker run -it {<imageid> | <image name>} command. From the logs shown in
console we can check if the Liferay instance does not go up correctly.
Using the docker ps command, and looking at the status column we should see
initially the health: starting value which should become healthy when the
Liferay service is on, as shown by the two figures below.


Once you have made all the checks about the goodness of the image, it is possible proceed with the commit and push operation of the modified files on the Git repository and then by pushing the newly created image to the Docker repository.
For subsequent image creation operations, operation is simplified whereas it is no longer necessary to install the liferay-docker extension at least initialize the Git repository. Console 9 shows the operations to follow in case you have already done other builds.
# Step 1 Clone the liferay-docker repository and create a new Liferay image build branch
#  - Replace the Git repository URL with your own
$ git clone https://github.com/smclab/liferay-docker.git
$ git checkout -b build/liferay-dxp-7.2.10-sp-3

# Step 2 Prepare the directory that will contain the bundles for Liferay DXP 7.2 SP 3
$ cd liferay-docker
$ cp -a ~/Downloads/bundles .

# Step 3 Running the image build process
$ ./build_local_image.sh bundles amusarra/liferay-dxp liferay-dxp-7.2.10-sp-3 no-push jboss-eap8. Creating an image with Liferay DXP 7.3
Here we are! As promised at the beginning of the article, let's see how to create the Docker image using the new version of Liferay DXP released October 13, 2020.
The procedure remains absolutely unchanged (see Figure 20 - Essential steps for creating the Docker Liferay DXP + JBoss EAP image). The first step is download the Liferay DXP 7.3 files to download from the Liferay Customer Portal.
The files are those indicated below.
- Liferay DXP Dependencies: liferay-dxp-dependencies-7.3.10-ga1-20200930160533946.zip
- Liferay DXP OSGi Dependencies: liferay-dxp-osgi-7.3.10-ga1-20200930160533946.zip
- Liferay DXP WAR: liferay-dxp-7.3.10-ga1-20200930160533946.war
- Liferay Patching Tool: patching-tool-2.0.15.zip
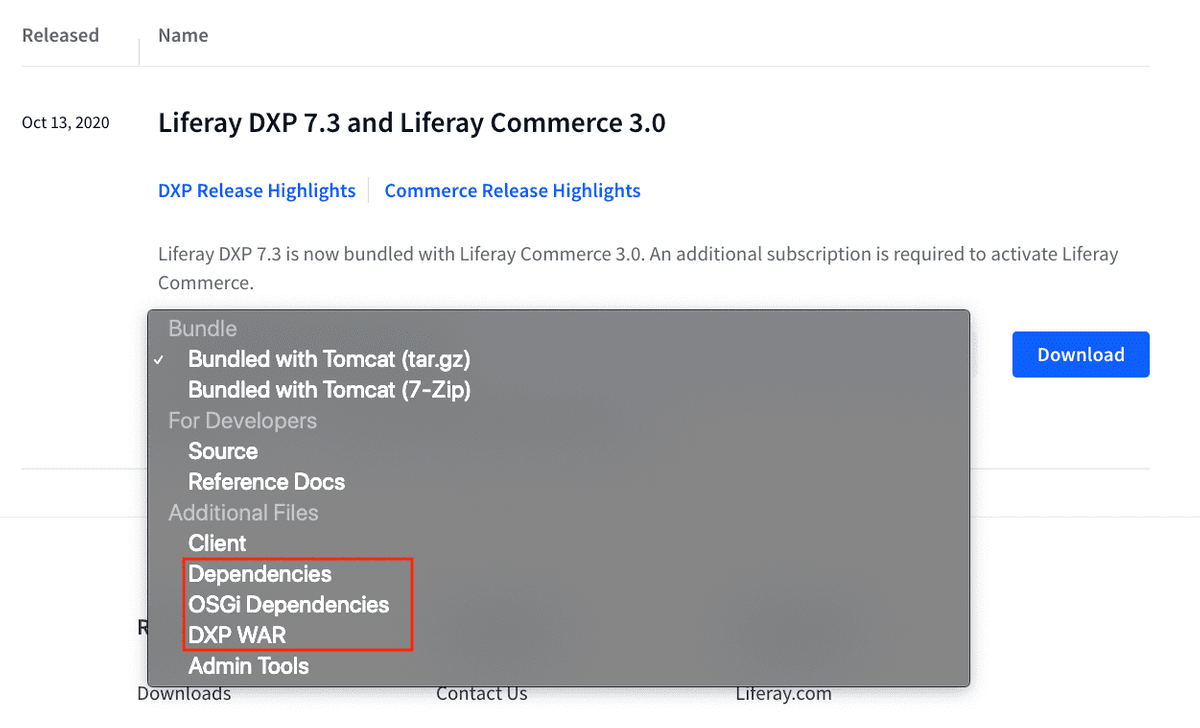
The Patching Tool you should have already downloaded in case you have made one of previous builds for Liferay DXP 7.2. As for version 7.3 you don't need to download anything else; just released, so there are no fix packs too if recommended, install the Patching Tool anyway. The figure below shows the download section for Liferay DXP 7.3, highlighting the file types mentioned download.
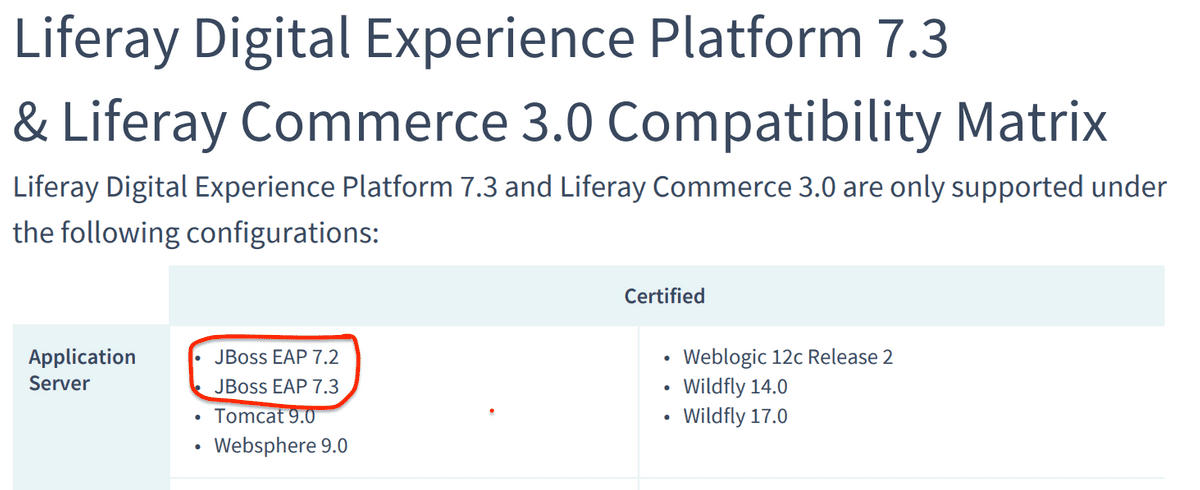
From the Liferay DXP 7.3 Compatibility Matrix document we can see the compatibility with the Red Hat JBoss EAP 7.3 Application Server. It is reasonable to think about installing Liferay DXP 7.3 on JBoss EAP 7.3.
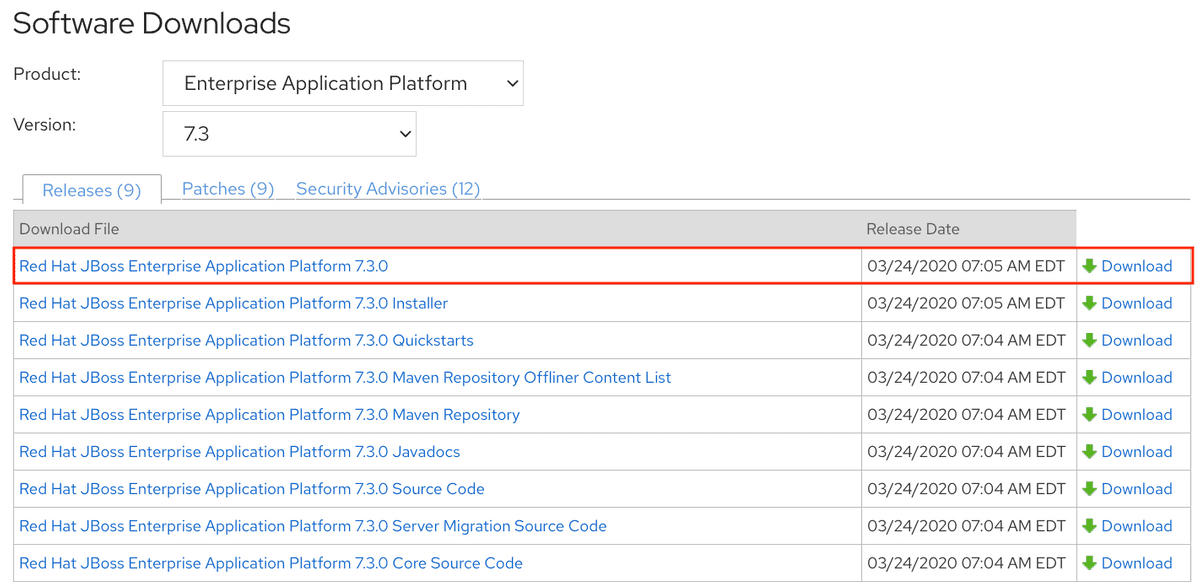
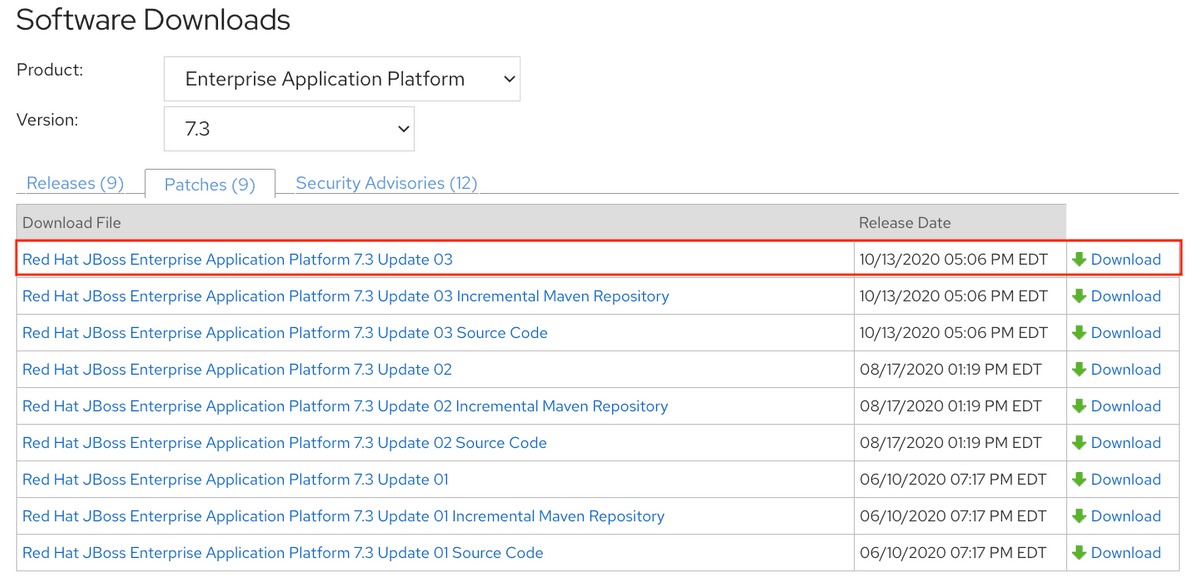
Then let's go to the Red Hat Customer Portal to download the following files concerning the new version of JBoss EAP 7.3.
- Red Hat JBoss Enterprise Application Platform 7.3: jboss-eap-7.3.0.zip
- Red Hat JBoss Enterprise Application Platform 7.3 Patch: jboss-eap-7.3.3-patch.zip
The two figures below show the files to download concerning JBoss EAP 7.3.
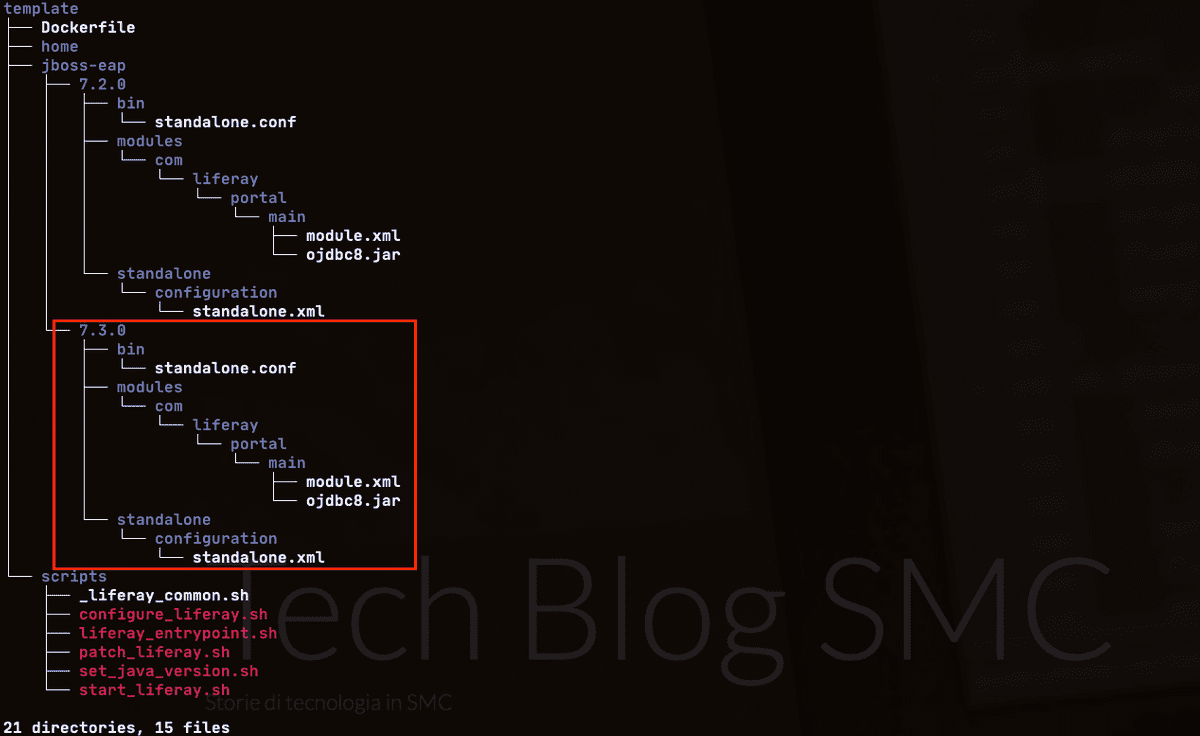
New version of JBoss and new configuration template (see 5.1. Template of JBoss EAP configuration) of which you will find the related files on the project extension liferay-docker.
As for Liferay, there are no substantial changes to be made compared to the previous version, the documentation is always valid Installing on JBoss EAP. The figure below shows the structure of the configuration template for JBoss EAP 7.3.
Regarding the specific configuration of Liferay, the only change made with
the new version concerns the module.xml file, to which two have been added
new resources, com.liferay.petra.sql.dsl.api.jar andcom.liferay.petra.sql.dsl.spi.jar.
<module name="com.liferay.portal" xmlns="urn:jboss:module:1.8">
    <resources>
        <resource-root path="com.liferay.petra.concurrent.jar" />
        <resource-root path="com.liferay.petra.executor.jar" />
        <resource-root path="com.liferay.petra.function.jar" />
        <resource-root path="com.liferay.petra.io.jar" />
        <resource-root path="com.liferay.petra.lang.jar" />
        <resource-root path="com.liferay.petra.memory.jar" />
        <resource-root path="com.liferay.petra.nio.jar" />
        <resource-root path="com.liferay.petra.process.jar" />
        <resource-root path="com.liferay.petra.reflect.jar" />
        <resource-root path="com.liferay.petra.sql.dsl.api.jar" />
        <resource-root path="com.liferay.petra.sql.dsl.spi.jar" />
        <resource-root path="com.liferay.petra.string.jar" />
        <resource-root path="com.liferay.registry.api.jar" />
        <resource-root path="portal-kernel.jar" />
        <resource-root path="portlet.jar" />
        <resource-root path="hsql.jar" />
        <resource-root path="ojdbc8.jar" />
    </resources>
    <dependencies>
        <module name="javax.api" />
        <module name="javax.mail.api" />
        <module name="javax.servlet.api" />
        <module name="javax.servlet.jsp.api" />
        <module name="javax.transaction.api" />
    </dependencies>
</module>At this point we should have all the required bundles at our disposal, we can then proceed with the creation of the image. The expected result it will be the Liferay DXP 7.3 GA1 image installed on JBoss EAP 7.3.
Assuming you have the liferay-docker project extension in the form of a Git repository (see 7. A real scenario), let's continue as indicated in Console 10 to get the new image.
# Step 1 Clone the liferay-docker repository and create a new Liferay image build branch
#  - Replace the Git repository URL with your own
$ git clone https://github.com/smclab/liferay-docker.git
$ git checkout -b build/liferay-dxp-7.3.10-ga1

# Step 2 Preparing the directory that will contain the bundles for Liferay DXP 7.3 GA 1
$ cd liferay-docker
$ cp -a ~/Downloads/bundles-dxp-73 .

# Step 3 Running the image build process
$ ./build_local_image.sh bundles-dxp-73 amusarra/liferay-dxp liferay-dxp-7.3.10-ga1 no-push jboss-eapThe first two figures below show you during the image creation process, patching JBoss EAP 7.3 and installing Patching Liferay tool.


Using the docker images command you can check for presence on the
newly created image system amusarra/liferay-dxp:liferay-dxp-7.3.10-ga1.

8.1. Test of the new Liferay DXP 7.3 image
In order to perform a verification of the newly created image, it is enough
run the docker run -it {<imageid> | <image name>} command. From the logs shown in
console we can check if the Liferay instance does not go up correctly.
The figure below shows that the container has gone up correctly, see the
STATUS column.

We could for example connect to the container and subsequently verify through the JBoss EAP console if the patch has been applied.
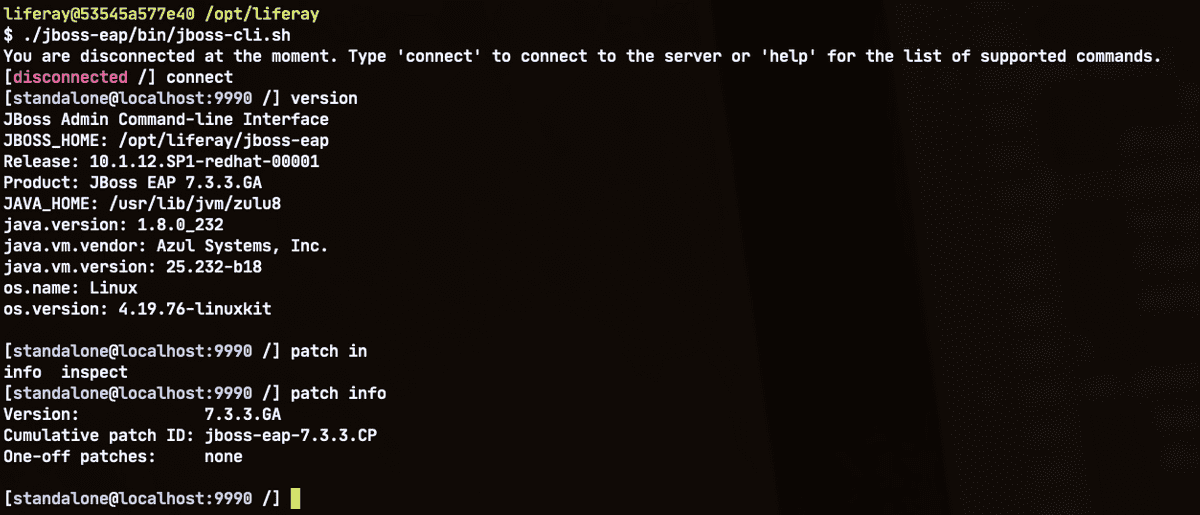
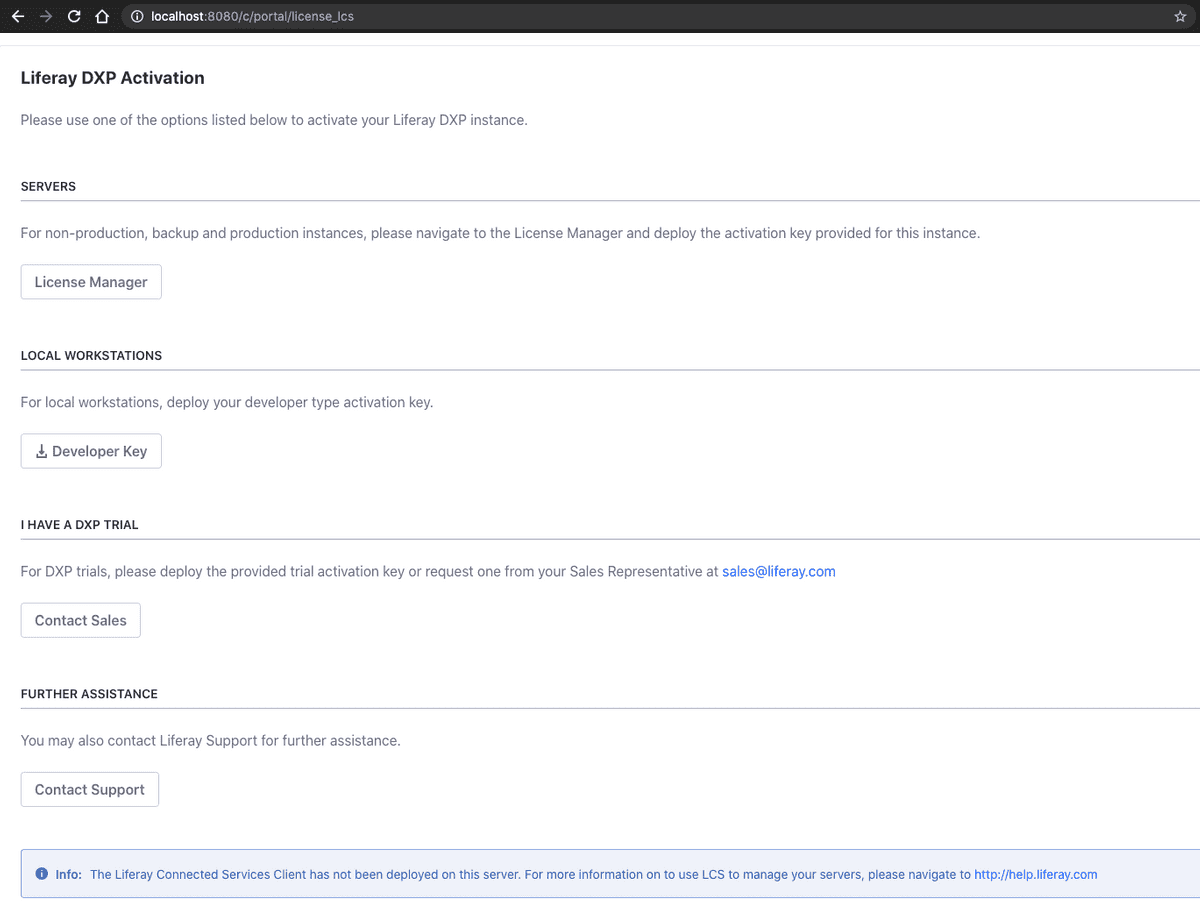
If we tried to make a connection to the portal via the browser, it would come license installation required. I remember that the images thus created are unlicensed; To use the portal, you need to install the license file copying it into the deploy directory.
9. Resources
The extension of the liferay-docker project is available on the SMC GitHub repository.
To follow I leave a series of resources that are the reference point for contents of this article.
- Leveraging Docker
- Creating a Liferay DXP Docker Container
- Configuring a Docker Container
- Deploying Liferay DXP Using Docker
- How to build a Docker Liferay 7.2 image with the Oracle Database support
10. Conclusions
Welcome to the end! For beings who have come to the end of reading this article, I'm pretty sure you've found yourself in the situation of having to create an image of Liferay, where Liferay is installed on a Application Server other than Apache Tomcat, or that you are about to have to deal with this activity.
I have found myself several times in this situation, and the path I wanted to indicate with this article it is the one that I consider most advantageous, especially in terms of simplicity in the image creation phase and finally, the image as well obtained conforms to those produced by Liferay itself.
How did you approach this subject? Let's discuss it together.