At the tenth Liferay Boot Camp 2022 is The topic of what Liferay offers in terms of security and how was discussed realize their own solutions using the framework that Liferay puts a at our disposal.
Remaining therefore on the subject of safety, in this article we will address how enable Multi-Factor Authentication (MFA) in particular by configuring the use of FIDO2 (Fast Identity Online 2) with the aim of being able to access the portal via your device (hardware token).
In the order we will see:
- What is FIDO2
- The two phases of WebAuthn
- What are the requirements to use FIDO2
- Multi-Factor Authentication configuration for FIDO2
- Authenticator registration procedure
- Authentication test with FIDO2
By reading this article to the end, you should then be able to easily add the additional authentication factor to the normal login process with username and password.
As usual I will leave the bonus at the end of the article, that is, the reference GitHub of the project which will allow you to recreate the scenario we're going to to describe. Plus I will leave you a short movie showing all the activities that were performed on the Liferay portal.
1. What is FIDO2: WebAuthn & CTAP
FIDO2 is an open standard (launched by FIDO Alliance and W3C) whose goal is to offer a passwordless authentication method (or password-less) for secure login as part of web authentication, using hardware verified for user identification.
With FIDO2, authentication takes place via a trusted device, which in technical terms is called authenticator. The connection between the authenticator and the browser can be established in several ways, such as for example: Bluetooth, USB or NFC. These devices can be of various types and in general:
- USB sticks such as those produced by Yubico and SecureClick
- Smart Card (also contactless) such as Wega 3DSA 2.0 Acoustic Card certified by the FIDO Alliance
- Chip Trusted Platform Module (TPM) already integrated in most smartphones, laptops and PCs
FIDO2 combines the specification W3C Web Authentication (WebAuthn) and the Client to Authenticator (CTAP) protocols of the FIDO Alliance.
The CTAP protocol resides at the application layer and is responsible for the secure communication between the verified hardware device (or authenticator ) and the client / platform (usually the browser) e ensure transparency with respect to the connection method which can be USB, NFC (Near-Field Communication) or Bluetooth.
The WebAuthn protocol, on the other hand, makes authentication possible by defining the process by which web applications can integrate key cryptography public/private (or asymmetric) in a browser. This occurs when they communicate via CTAP protocol with the authenticator (TPM module or key USB).
This API allows Relying Parties (or Service Providers) to register and authenticate users through very secure asymmetric encryption, rather than through a password.
The FIDO2 standard is currently supported by Windows 10, Android and the web browsers Google Chrome, Mozilla Firefox, Microsoft Edge and Apple Safari.
We could therefore summarize the main characteristics of FIDO2 in:
- Authentication with external or integrated hardware keys (see Apple launches web authentication using FIDO standard with Touch ID or Face ID biometrics in Safari)
- Two-factor authentication
- Asymmetric public/private key encryption;
- Authenticator stored locally
I leave you the insights on the subject, starting from reading the How FIDO Works document published on the FIDO Alliance portal.
2. The two phases of WebAuthn
The WebAuthn protocol essentially has two phases, which are:
- The credential registration flow
- The credential authentication flow
In a password-based user registration flow, the user comes presented a form that requires a username and password, the latter is then sent to the server for archiving.
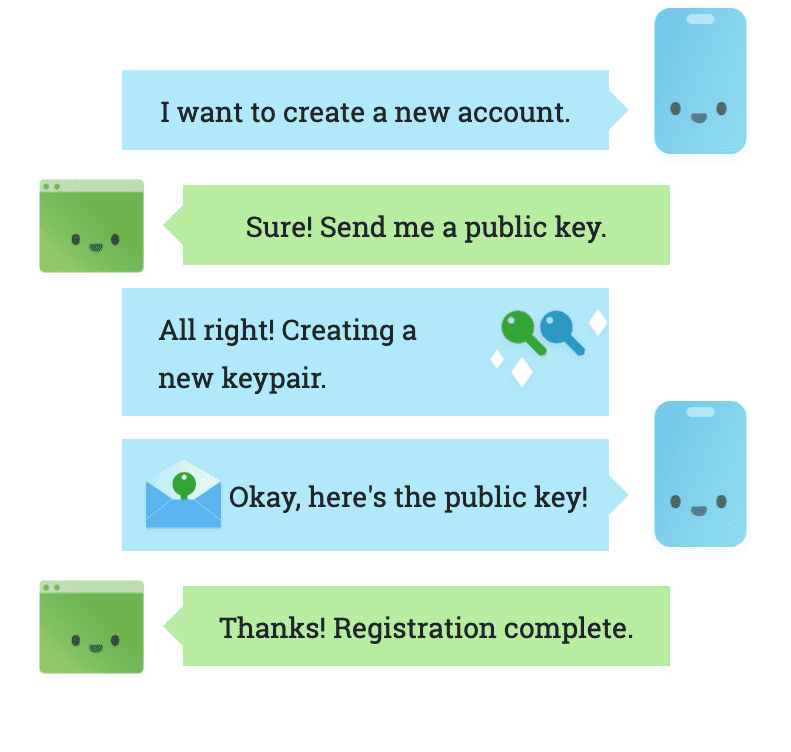
In WebAuthn, a server must provide data that binds a user to a credential (a private-public key pair); this data includes identifiers for the user and the organization (also known as a Relying Party). The website will then use the WebAuthn API to prompt the user to create a new key pair. It is important to note that we need a randomly generated string by the server as a challenge in order to prevent attacks.
The dialogue shown below gives an exact idea of the flow of WebAuthn credential registration described above.
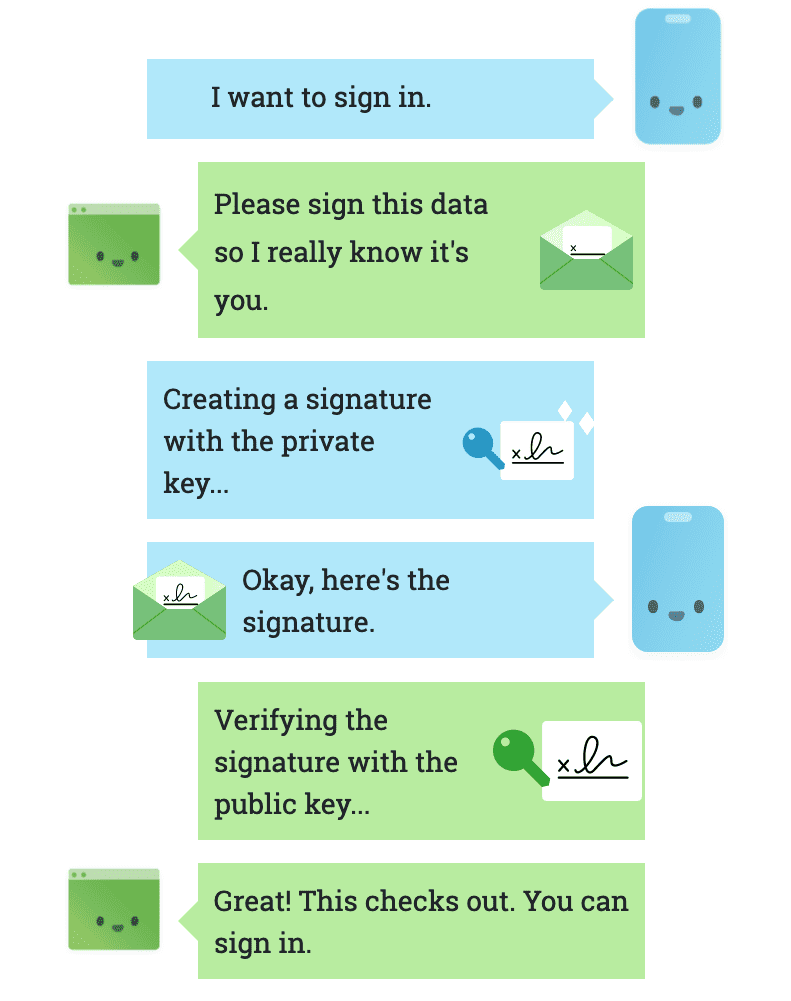
At the end of the registration, the user can be authenticated. An assertion will be created during authentication, which is proof that the user has the private key. This assertion contains a signature (or signature) created using the key private. The server uses the public key retrieved during the registration to verify this signature.
The dialogue shown below gives an exact idea of the flow of WebAuthn credential authentication described above.
To learn more about the use of the WebAuthn API of registration and authentication, I recommend reading WebAuthn: A better alternative for securing our sensitive information online.
We will then see these two phases of registration and authentication distinct from a practical point of view right on Liferay.
3. Requirements for using FIDO2 with Liferay
Before proceeding with the configuration of the Multi-Factor Authentication (MFA) through FIDO2, it is necessary that you have the availability of one Security Key or Token and the latter is FIDO2 certified (see FIDO Certified Showcase).
For the case presented in this article, I will use the Security Key (or Token) YubiKey 5 Series. I preferred to opt for this hardware device as it offers support multi-protocol enabling strong security for legacy and modern environments. This Security Key is also recommended by Liferay.
The main features of this series of Security Keys:
- Multi-protocol support; FIDO2, U2F, Smart Card, OTP, OpenPGP 3
- USB-A, USB-C, NFC, Lightning
- IP68 rated, crush resistant, no batteries required, no moving parts
4. Multi-Factor Authentication configuration for FIDO2
The Fast IDentity Online 2 or FIDO2 standard allows the use of biometric data (i.e. fingerprint readers), mobile devices or other keys of security for passwordless authentication. Administrators just have to enable FIDO2 for their instance, then users can register and use their FIDO2 compatible devices.
Warning! Multi-Factor Authentication is only available with Liferay DXP, it is therefore not possible to activate it on the Community Edition.
Before you can configure FIDO2, you need to enable the Multi-Factor Authentication. The default state is enabled at the system level but disabled in the default instance. In effect, this means that MFA is indeed disabled on installations Liferay DXP standard.
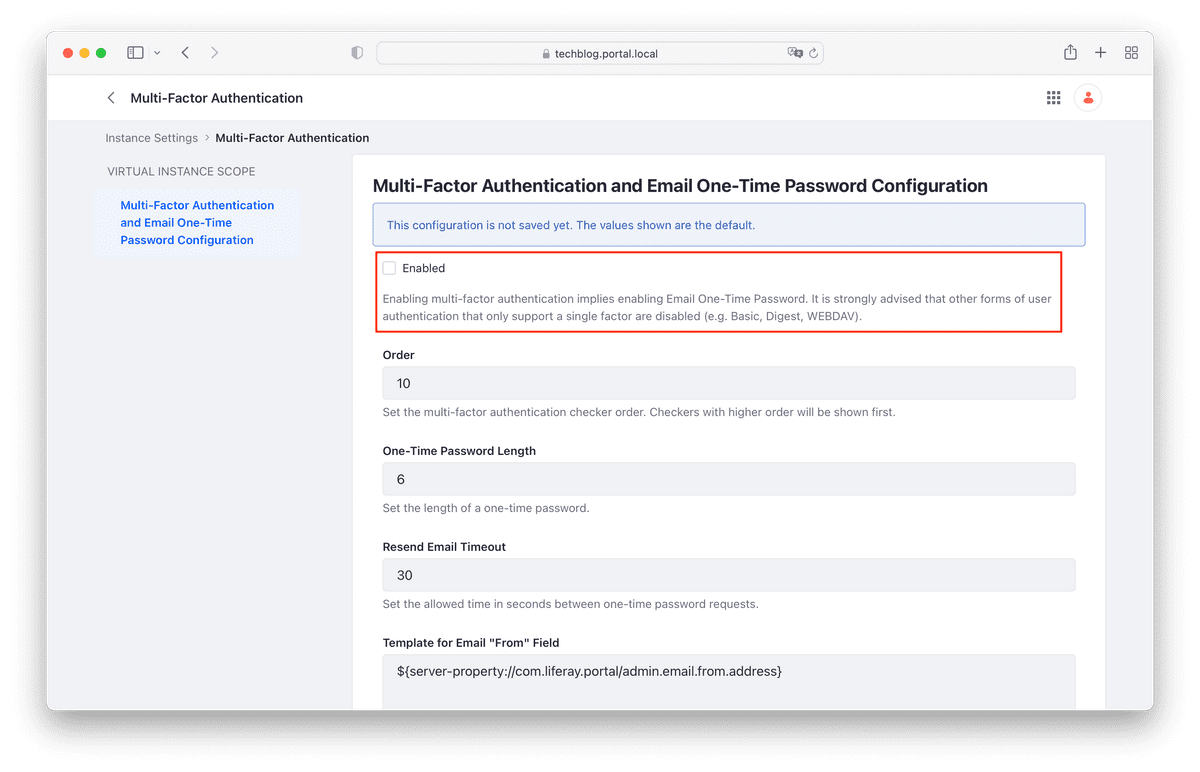
What we need to do now is to enable the MFA for the portal instance. This activity requires only two steps:
- Go to Control Panel → Instance Settings → Security → Multi-Factor Authentication → Multi-Factor Authentication One-Time Password Configuration
- Check the Enabled box and click the Save button
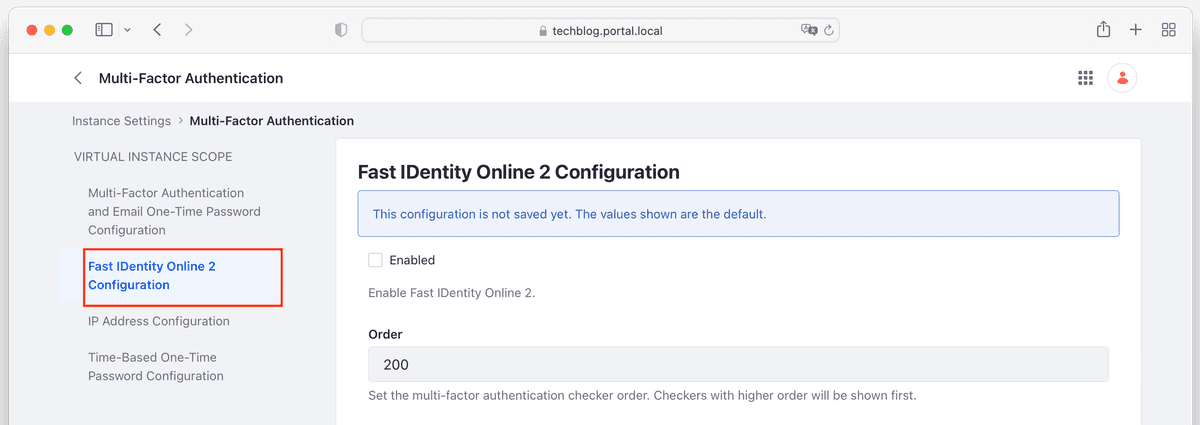
The two figures below show the exact steps to take. Immediately after you saved the configuration, you should see the le appear on the left shoulder other possible configurations for MFA, one of which is that of FIDO2 (see figure 7).
From the moment the MFA is active, the next login will be required specify the One-Time Password (OTP) code sent by email for this reason it is important to configure the server correctly SMTP for sending email.
Once Multi-Factor Authentication is enabled, you can enable and configure the use of FIDO2. To carry out this operation it is sufficient proceed as follows:
- Go to Control Panel → Instance Settings → Security → Multi-Factor Authentication. Make sure you have enabled multi-factor authentication before configuring FIDO2 (see previous step)
- Click Fast IDentity Online 2 Configuration in the left navigation bar
- Click the Enabled checkbox to enable FIDO2
By leaving the configuration with the default values, this may be fine for start testing on your local environment.
You can act on the following settings:
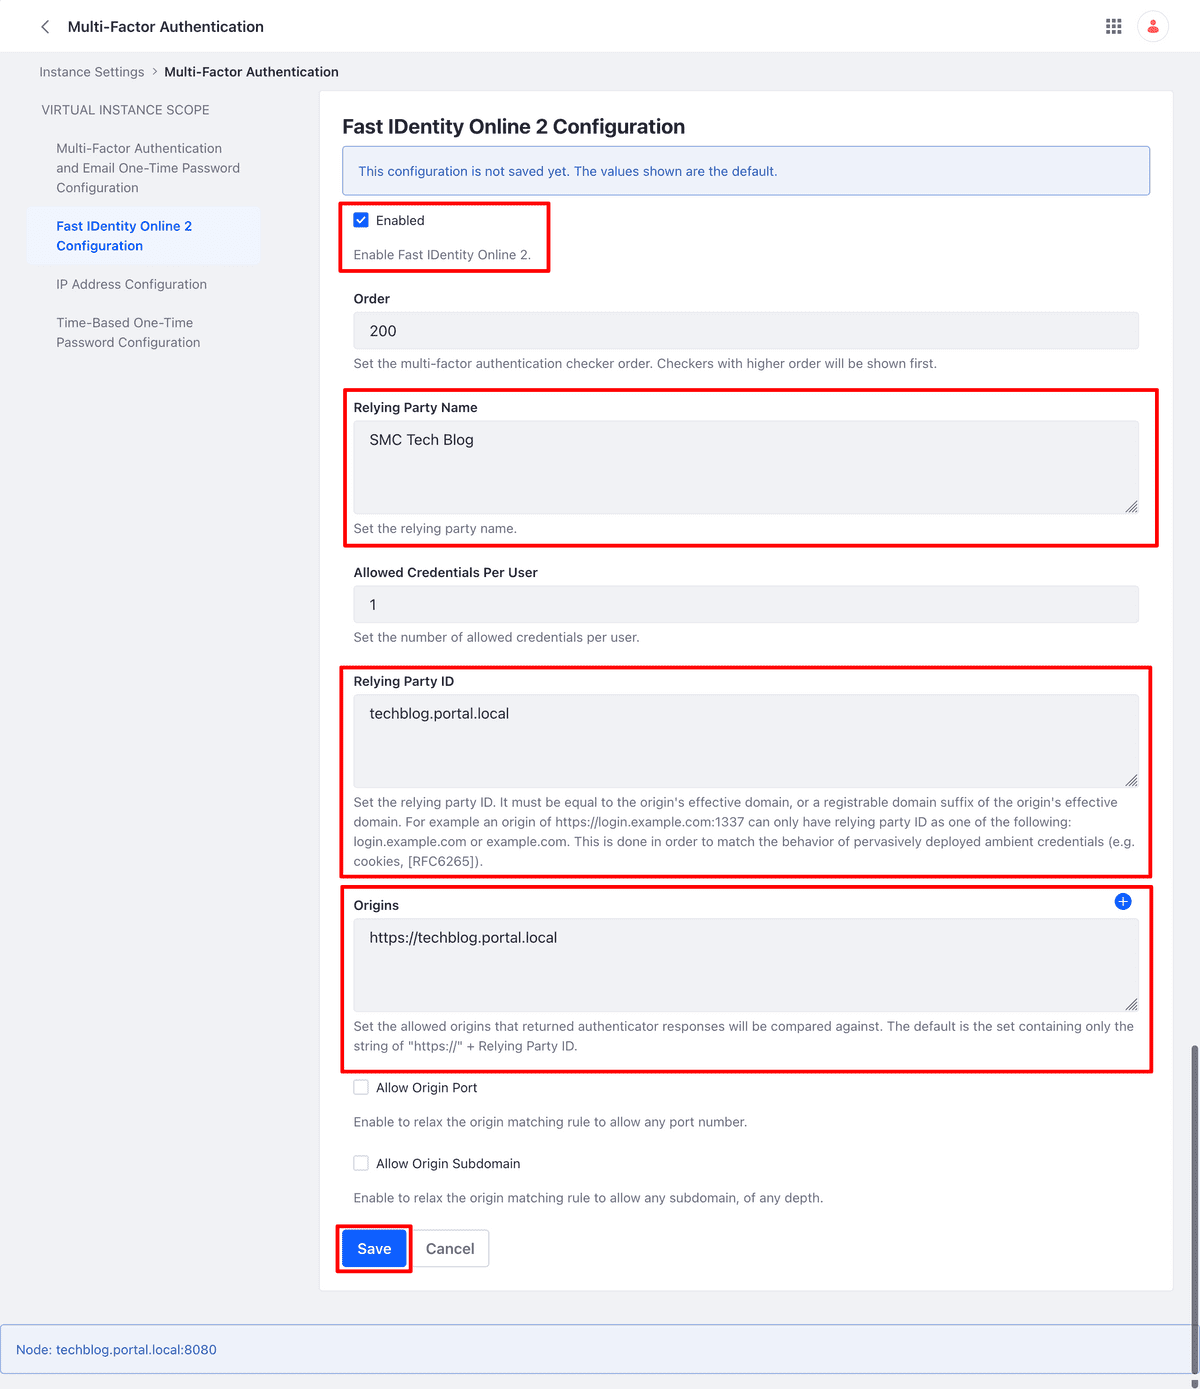
- Order: Set the priority for MFA control via FIDO2. The higher the number, the higher the priority. The default priority is set so that FIDO2 becomes the highest priority controller when enabled.
- Relying Party Name: An arbitrary name for the website or installation.
- Allowed Credentials Per User: Each user can have the set number of FIDO2 devices.
- Relying Party ID: the WebAuthn Relying Party identifier. It is typically set with the portal domain name.
- Origins: Authenticator responses are compared to this source URL, which should point to your installation or otherwise to the virtual host of the specific Liferay instance. You can add several values for this configuration. For security reasons it is always recommended to use https to encrypt the connection.
- Allow Origin Port: Check this box to include any port number in the origin matching rule. Setting this option could be useful in a development/test environment.
- Allow Origin Subdomain: Check this box to include any source subdomain in the origin matching rule.
Assuming a real case, we could think of setting the following values configuration:
- Relying Party Name: SMC Tech Blog
- Relying Party ID: techblog.portal.local
- Origins: https: //techblog.portal.local
The figure below shows the configuration of FIDO2 with the values applied mentioned above.
The same configuration is possible using the
OSGi configuration
(those that are located in $LIFERAY_HOME/osgi/configs).
Following is the content of the file com.liferay.multi.factor.authentication.fido2.web.internal.configuration.MFAFIDO2Configuration.scoped~3da064c9-3224-405d-8dc6-677104a70170.config
which shows the same configuration shown in Figure 8.
allowOriginPort=B"false"
allowOriginSubdomain=B"false"
allowedCredentialsPerUser=I"1"
companyId=L"34701"
enabled=B"true"
origins=[ \
  "https://techblog.portal.local", \
  ]
relyingPartyId="techblog.portal.local"
relyingPartyName="SMC\ Tech\ Blog"
service.ranking=I"200"
4. Authenticator registration procedure
Once FIDO2 is enabled, users will be able to add authenticators directly from the user's account settings by following the steps indicated below. This process implements the registration flow of the WebAuthn credentials described above and shown in Figure 1.
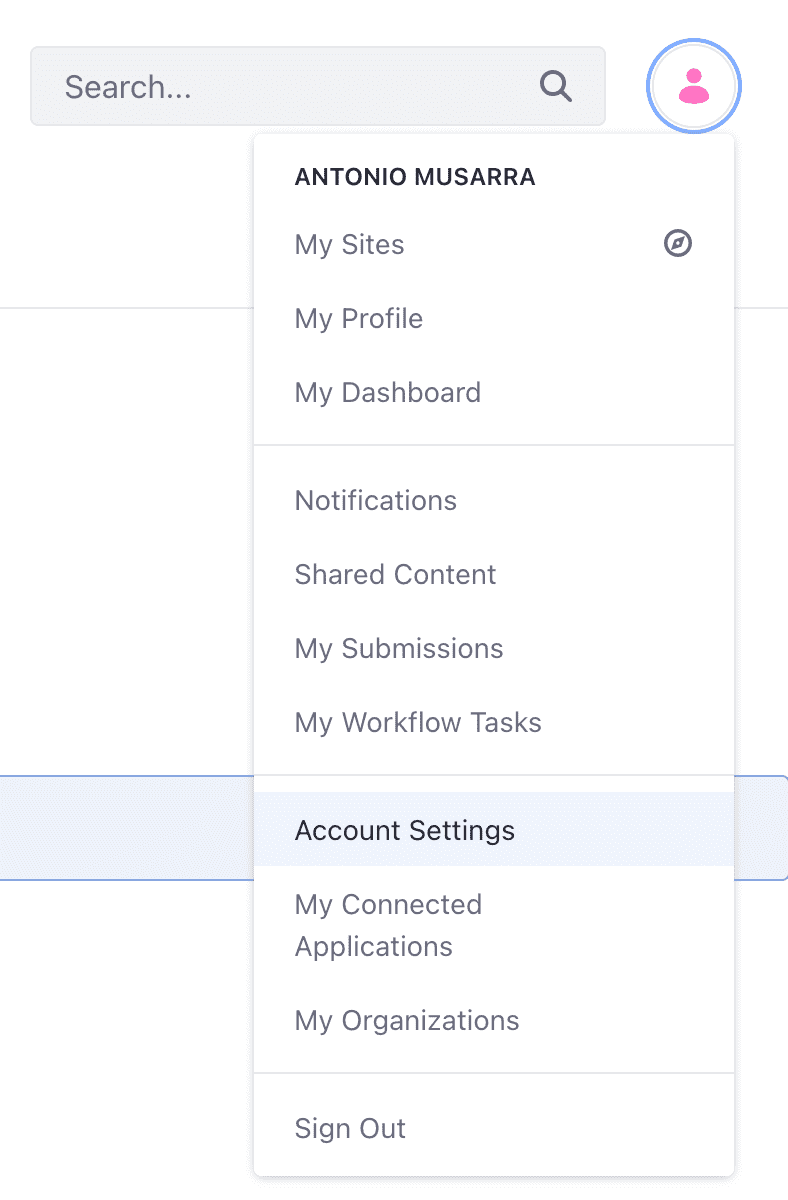
- Click on your profile picture
- Click Account Settings
- A new tab will appear at the top, called Multi-Factor Authentication, so click on it
- Make sure your FIDO2 compliant device is connected to your PC (for example via USB)
- To register the authenticator, click the large blue button labeled Register a FIDO2 Authenticator
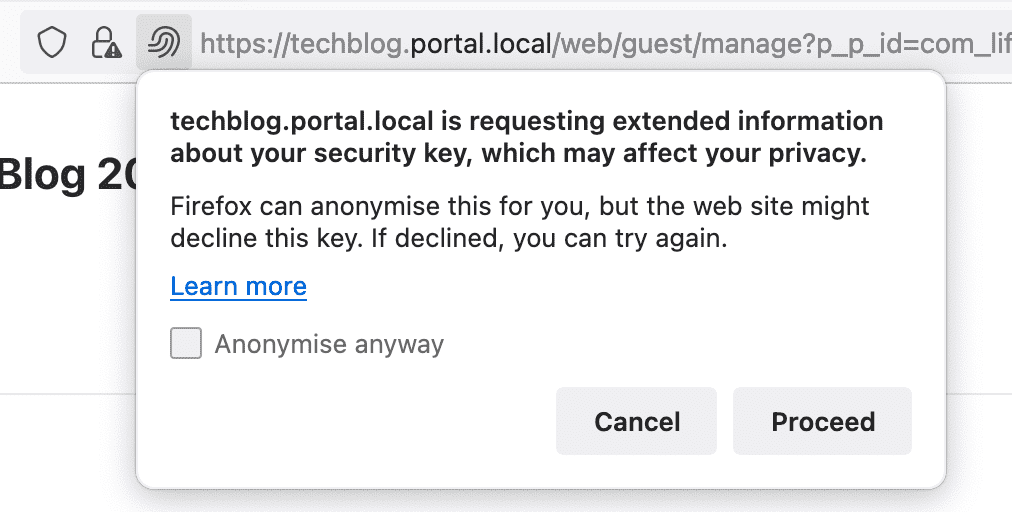
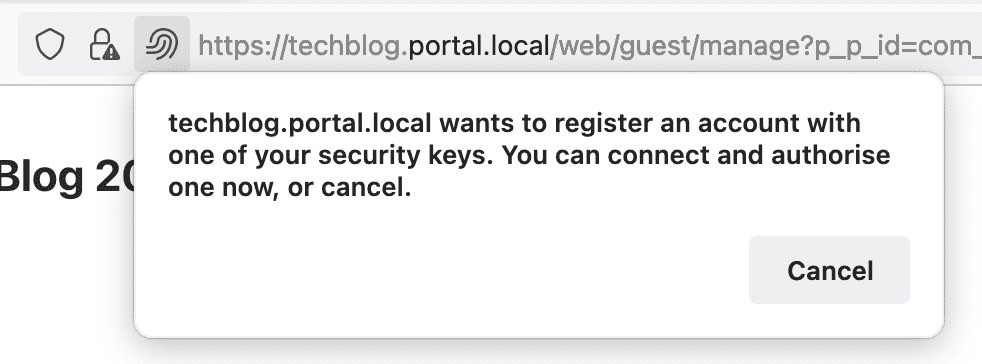
When you proceed with registration, your browser may show security warnings, such as those shown below that they do reference to Firefox (version 100.0.1 64bit). Other browsers may have different behaviors but with the same intent.
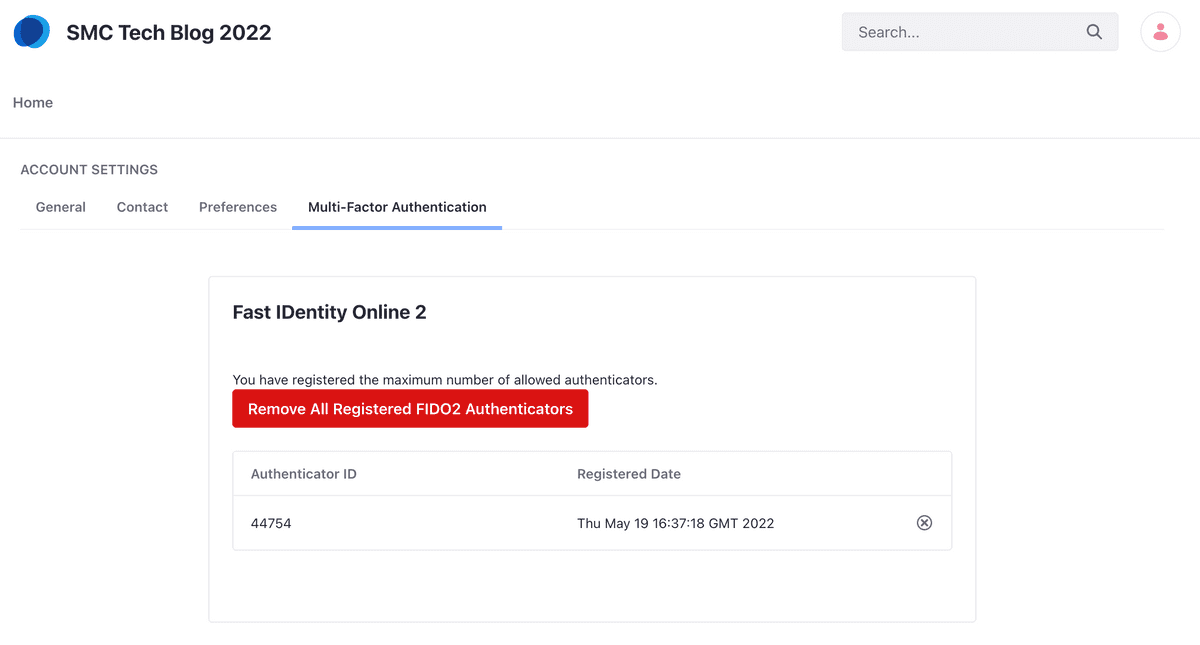
Once the registration process has been completed successfully, you should see your Security Key or Authenticator (to stay within the terms of FIDO2) registered on your account. From now on you will be able to log in to the Liferay portal using your Security Key as another factor authentication.
After registration is complete, the information is stored in the table
mfafido2credentialentry from Liferay whose structure is shown below.
The public key is available among the stored information
(in credentialkey).
lportal=# \d mfafido2credentialentry;
 mvccversion               | bigint                      |           | not null | 0
 mfafido2credentialentryid | bigint                      |           | not null |
 companyid                 | bigint                      |           |          |
 userid                    | bigint                      |           |          |
 username                  | character varying(75)       |           |          |
 createdate                | timestamp without time zone |           |          |
 modifieddate              | timestamp without time zone |           |          |
 credentialkey             | text                        |           |          |
 credentialkeyhash         | bigint                      |           |          |
 credentialtype            | integer                     |           |          |
 failedattempts            | integer                     |           |          |
 publickeycose             | character varying(128)      |           |          |
signaturecount | bigint | | |The data contained in the table are shown below mfafido2credentialentry.
lportal=# select * from mfafido2credentialentry;
mvccversion               | 8
mfafido2credentialentryid | 44754
companyid                 | 34701
userid                    | 44725
username                  | Antonio Musarra
createdate                | 2022-05-19 16:37:18.277
modifieddate              | 2022-05-19 23:53:10.883
credentialkey             | bzLIWZQhw1fEuKlRrdNAoJxYJR/g1Z+BgRhbywlMp8hA9rqIJSyUPq9kS2xxLj3Ps1wSsr4nrNgjVirGz4oCOA==
credentialkeyhash         | 236161127
credentialtype            | 0
failedattempts            | 0
publickeycose             | pQECAyYgASFYIN4KLjv3JhB4SMwAB8e43wDEMDXJvM7Ag8Z7xxqFlDRrIlggO8V4jr/1JZcsj5kybUQfzDTG0vJvZi2yi4M6XTsfMXI=
signaturecount | 27In some cases it may happen that the registration process does not go to successful and the most common reasons are generally:
- The browser version does not support the WebAuthn protocol. In this case I recommend updating the browser and consulting the document FIDO2: Web Authentication (WebAuthn) and in particular the chapter Support for FIDO2: WebAuthn and CTAP - Browsers and Platforms
- The hardware device (or authenticator) is not supported by your operating system. Refer to the technical documentation of the Security Key
- The hardware device does not comply with the FIDO2 specification. Refer to the technical documentation of the Security Key
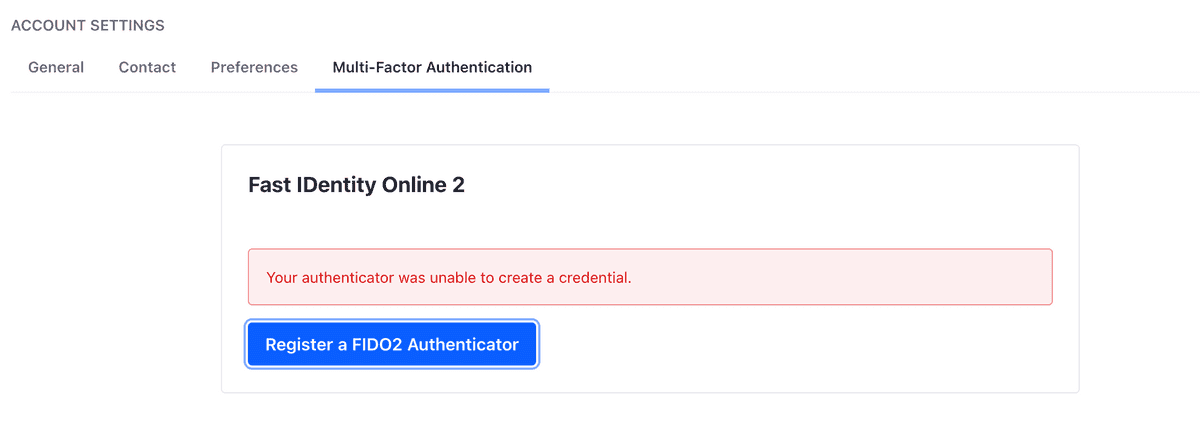
The figure below shows the message in case of errors in the process registration. Consulting the portal log file should help understand the cause of the registration error.
5. Authentication test with FIDO2
Now that the authenticator is registered in your profile, you can use it to access the Liferay portal.
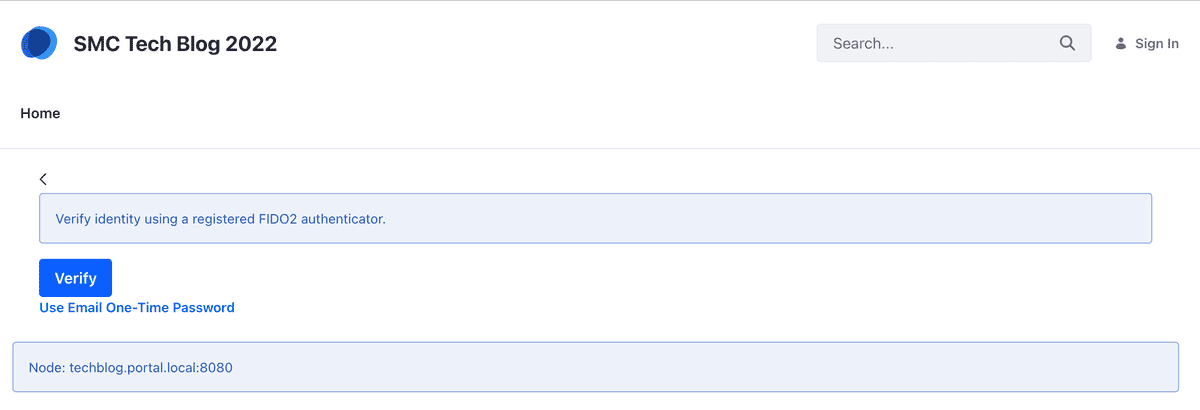
After you have entered your own correctly username and password (via the standard login widget), the button that offers the possibility to verify the identity using the registered FIDO2 authenticator (see figure below).
In case of problems with access via FIDO2, it is still possible to request the access OTP via e-mail.
6. The bonus
I imagine having a Docker Compose availability with all services configure that implements the scenario described, it is a nice bonus; you are from same idea?
The how-to-configure-fido2 project published on SMC's GitHub repository, it contains the Docker Compose and all configurations that allow you to implement the scenario described in the course of this article.
The services that make up the stack are listed below.
- Liferay DXP 7.4
- PostgreSQL (database per Liferay)
- Server SMTP (servizio per l'invio email)
- Traefik (Load Balancer)
The Liferay portal service is configured to be accessible through Traefik on the https port and on the techblog.portal.local FQDN.
The steps needed to run the entire stack are:
- Check the Docker version (Docker Engine 20.10.x, Docker Compose 1.29.x)
- Clone the how-to-configure-fido2 repository
- Update the hosts file (of the host machine) with the entries for Liferay
- Starting the stack via Docker Compose
Regarding the Docker version, for this article we made use of Docker Desktop for macOS version 4.8.0 (which includes Docker Engine 20.10.14 and Docker Compose 1.29.2).
I still ran a test using Docker on Linux. Same version of Docker used on macOS but with a lower Docker Compose version, that is, 1.28.6. I didn't find any problems, the services stack was fine pulled up.
I was unable to test on Windows; I leave it to some of you to run this proof.
# Step 1 - Check Docker version
$ docker version
$ docker-compose version

# Step 2 - Clone the project git repository
$ git clone https://github.com/smclab/how-to-configure-fido2.git

# Step 3 - Update the /etc/hosts with this content
127.0.0.1   techblog.portal.local

# Step 4 - Start the Docker Compose stack services (in fg o bg)
$ docker-compose up
$ docker-compose up -dBelow is instead available the video that shows the entire setup of the portal Liferay that we saw in the course of the article.
6. Conclusion
During the speech Liferay Authentication: How to create a Token-based SSO system, we got to see the possibilities that Liferay offers about the mechanisms of authentication and the extension modalities that allow to develop the own solutions.
Attention! You can download all the material of the Liferay Boot Camp 2022 by following the link https://bit.ly/download-materials-lrbc22zegovina

In the course of this article we have instead seen in detail how to configure and use the Multi-factor Authentication, authentication mechanism supported OOTB (Out Of The Box) from DXP edition. Use of the Security Tocken (hardware) is a second authentication factor, that is, after the user has entered the username and password pair correctly. Through appropriate extensions from develop, it would be possible to make access to the Liferay portal completely *password-less and this could be the subject of another article.
