In recent years, the authentication protocol has become increasingly popular OpenID Connect (OIDC), based on OAuth2, to provide secure access to applications and APIs (Application Programming Interface).
In this article we will see how to undertake a correct configuration of Keycloak and Liferay in order to enable the user authentication process using the protocol OpenID Connect. I would like to point out that the article is not a guide to installing Liferay and Keycloak.
To understand what is described in the article, a good knowledge of the administrative aspects of both Liferay and Keycloak, as well a basic knowledge of SSO (Single Sign-On systems).
As usual I will leave the end-of-article bonus, that is, the GitHub reference of the project that will allow you to recreate the scenario we are going to describe.
1 - Requirements
The reference versions of Liferay and Keycloak that we will consider are respectively 7.3 GA6 and 15.0.2 (released August 20, 2021).
So that you can successfully complete the integration configuration between Keycloak and Liferay, a Liferay instance needs to be available and an instance of Keycloak.
For Liferay and Keycloak configuration tasks you need to have login credentials and that they have an administrator role for both systems.
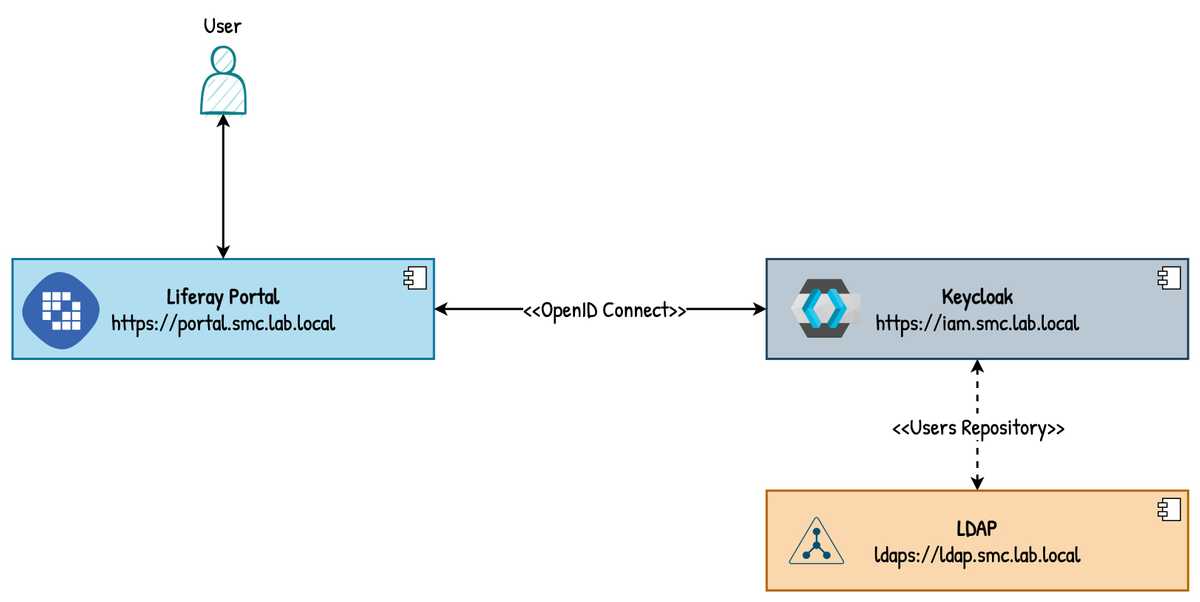
The diagram in the figure below shows the integration scenario at a high level that we are going to implement and what protocols are used. The LDAP component has been inserted but it is completely optional, you will find it, however, within the bonus.
The Fully Qualified Domain Name (FQDN) reported on the components of the scenario integration are by way of example.
It is important to remember that for the configuration to be successful it is essential that the systems involved can communicate with each other through the protocols also required (https and ldaps) in SSL/TLS environments must be correctly set the TrustStore. This clarification serves to avoid incurring annoying errors (e.g. validation of the X509 certification chain).
2 - Keycloak configuration
The first activity to be performed is to configure the Keycloak instance. This operation requires several steps which are indicated below.
- Creation of a specific Realm
- Creating an OpenID Connect client
- Creating an OpenID Connect Identity Provider (or IdP)
- Demo user creation (optional if you have configured an LDAP service)
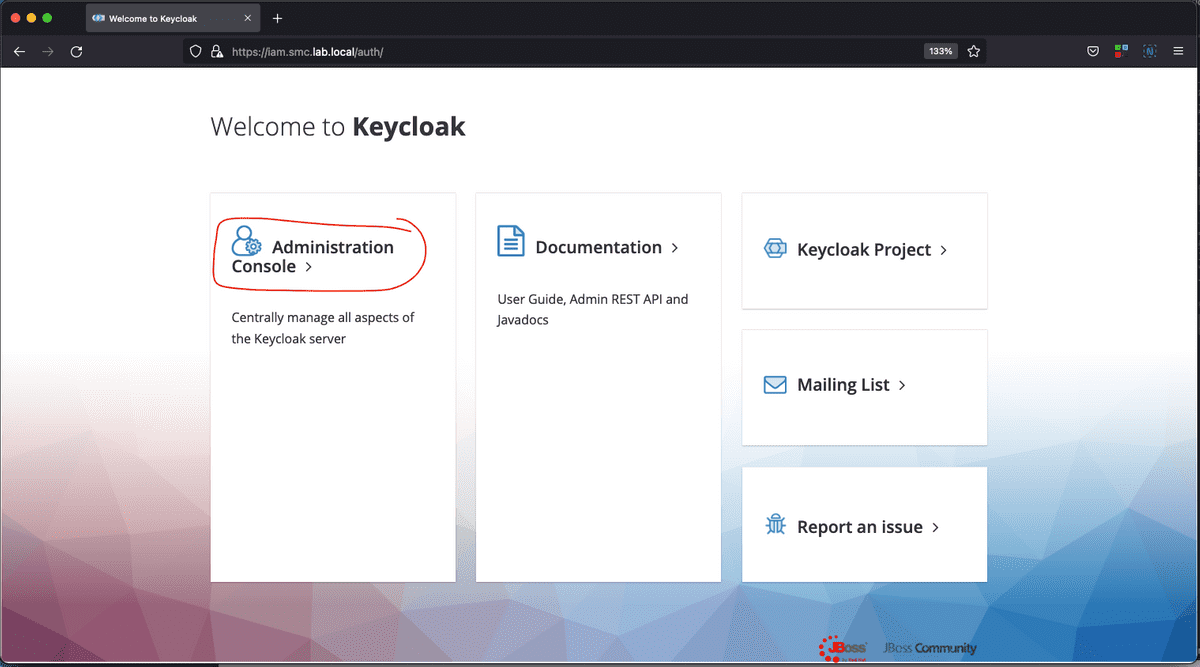
We therefore assume that the Keycloak instance is operational and access the administration using the administration credentials. Because of this scenario we assume that the Keycloak instance is available at the address https://iam.smc.lab.local/ (see figure below).
For any doubt and/or further information regarding the installation and configuration of Keycloak, refer to the official documentation available at https://www.keycloak.org/archive/documentation-15.0.html
2.1 - Creation of the Realm
A Realm in Keycloak is the equivalent of a tenant (group of users who share common access to a multi-tenant software system). It allows to create isolated groups of applications and users. By default there is a single realm in Keycloak called master, this is dedicated to management Keycloak and should not be used for the rest of the applications.
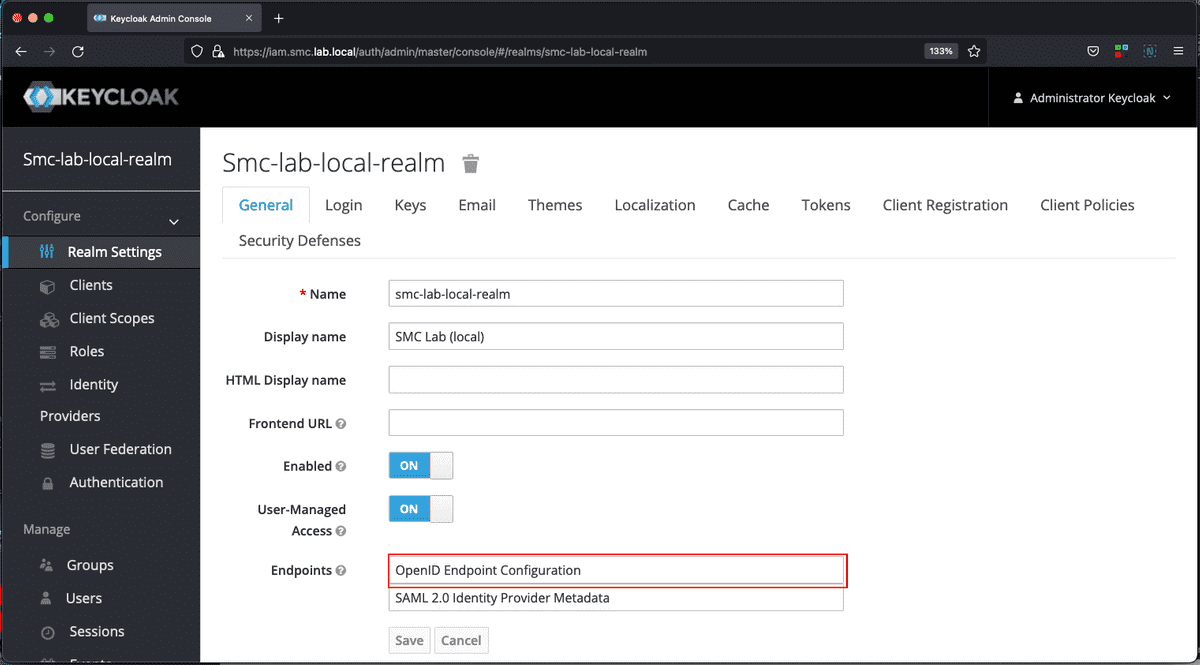
The first step requires the creation of a new Realm that we could for example call smc-lab-local-relam.
The previous figure highlights the OpenID Connect configuration endpoint. This endpoint contains all configuration metadata pertaining to the protocol, such as: Token URL, Authorization URL, Issuer, etc. This information will be useful for subsequent configuration activities, on both Keycloak and Liferay.
The configuration URL in this case is: https://iam.smc.lab.local/auth/realms/smc-lab-local-realm/.well-known/openid-configuration.
Note: This is the URL that Liferay will use to get the metadata of configuration, for this reason it is important that this address be reachable and that the SSL/TLS certificate configuration is correct.
Pointing your browser at the configuration metadata address, you will get a JSON document like the one shown below.
{
	"issuer": "https://iam.smc.lab.local/auth/realms/smc-lab-local-realm",
	"authorization_endpoint": "https://iam.smc.lab.local/auth/realms/smc-lab-local-realm/protocol/openid-connect/auth",
	"token_endpoint": "https://iam.smc.lab.local/auth/realms/smc-lab-local-realm/protocol/openid-connect/token",
	"introspection_endpoint": "https://iam.smc.lab.local/auth/realms/smc-lab-local-realm/protocol/openid-connect/token/introspect",
	"userinfo_endpoint": "https://iam.smc.lab.local/auth/realms/smc-lab-local-realm/protocol/openid-connect/userinfo",
	"end_session_endpoint": "https://iam.smc.lab.local/auth/realms/smc-lab-local-realm/protocol/openid-connect/logout",
	"jwks_uri": "https://iam.smc.lab.local/auth/realms/smc-lab-local-realm/protocol/openid-connect/certs",
	"check_session_iframe": "https://iam.smc.lab.local/auth/realms/smc-lab-local-realm/protocol/openid-connect/login-status-iframe.html",
	"grant_types_supported": ["authorization_code", "implicit", "refresh_token", "password", "client_credentials", "urn:ietf:params:oauth:grant-type:device_code", "urn:openid:params:grant-type:ciba"],
	"response_types_supported": ["code", "none", "id_token", "token", "id_token token", "code id_token", "code token", "code id_token token"],
	"subject_types_supported": ["public", "pairwise"],
	"id_token_signing_alg_values_supported": ["PS384", "ES384", "RS384", "HS256", "HS512", "ES256", "RS256", "HS384", "ES512", "PS256", "PS512", "RS512"],
	"id_token_encryption_alg_values_supported": ["RSA-OAEP", "RSA-OAEP-256", "RSA1_5"],
	"id_token_encryption_enc_values_supported": ["A256GCM", "A192GCM", "A128GCM", "A128CBC-HS256", "A192CBC-HS384", "A256CBC-HS512"],
	"userinfo_signing_alg_values_supported": ["PS384", "ES384", "RS384", "HS256", "HS512", "ES256", "RS256", "HS384", "ES512", "PS256", "PS512", "RS512", "none"],
	"request_object_signing_alg_values_supported": ["PS384", "ES384", "RS384", "HS256", "HS512", "ES256", "RS256", "HS384", "ES512", "PS256", "PS512", "RS512", "none"],
	"response_modes_supported": ["query", "fragment", "form_post"],
	"registration_endpoint": "https://iam.smc.lab.local/auth/realms/smc-lab-local-realm/clients-registrations/openid-connect",
	"token_endpoint_auth_methods_supported": ["private_key_jwt", "client_secret_basic", "client_secret_post", "tls_client_auth", "client_secret_jwt"],
	"token_endpoint_auth_signing_alg_values_supported": ["PS384", "ES384", "RS384", "HS256", "HS512", "ES256", "RS256", "HS384", "ES512", "PS256", "PS512", "RS512"],
	"introspection_endpoint_auth_methods_supported": ["private_key_jwt", "client_secret_basic", "client_secret_post", "tls_client_auth", "client_secret_jwt"],
	"introspection_endpoint_auth_signing_alg_values_supported": ["PS384", "ES384", "RS384", "HS256", "HS512", "ES256", "RS256", "HS384", "ES512", "PS256", "PS512", "RS512"],
	"claims_supported": ["aud", "sub", "iss", "auth_time", "name", "given_name", "family_name", "preferred_username", "email", "acr"],
	"claim_types_supported": ["normal"],
	"claims_parameter_supported": true,
	"scopes_supported": ["openid", "offline_access", "web-origins", "phone", "roles", "email", "address", "profile", "microprofile-jwt"],
	"request_parameter_supported": true,
	"request_uri_parameter_supported": true,
	"require_request_uri_registration": true,
	"code_challenge_methods_supported": ["plain", "S256"],
	"tls_client_certificate_bound_access_tokens": true,
	"revocation_endpoint": "https://iam.smc.lab.local/auth/realms/smc-lab-local-realm/protocol/openid-connect/revoke",
	"revocation_endpoint_auth_methods_supported": ["private_key_jwt", "client_secret_basic", "client_secret_post", "tls_client_auth", "client_secret_jwt"],
	"revocation_endpoint_auth_signing_alg_values_supported": ["PS384", "ES384", "RS384", "HS256", "HS512", "ES256", "RS256", "HS384", "ES512", "PS256", "PS512", "RS512"],
	"backchannel_logout_supported": true,
	"backchannel_logout_session_supported": true,
	"device_authorization_endpoint": "https://iam.smc.lab.local/auth/realms/smc-lab-local-realm/protocol/openid-connect/auth/device",
	"backchannel_token_delivery_modes_supported": ["poll"],
	"backchannel_authentication_endpoint": "https://iam.smc.lab.local/auth/realms/smc-lab-local-realm/protocol/openid-connect/ext/ciba/auth"
}
Remember that: Configuration metadata is important for later configuring the Liferay OpenID Connect component. So keep aside these data.
2.2 - Creating the OpenID Connect client
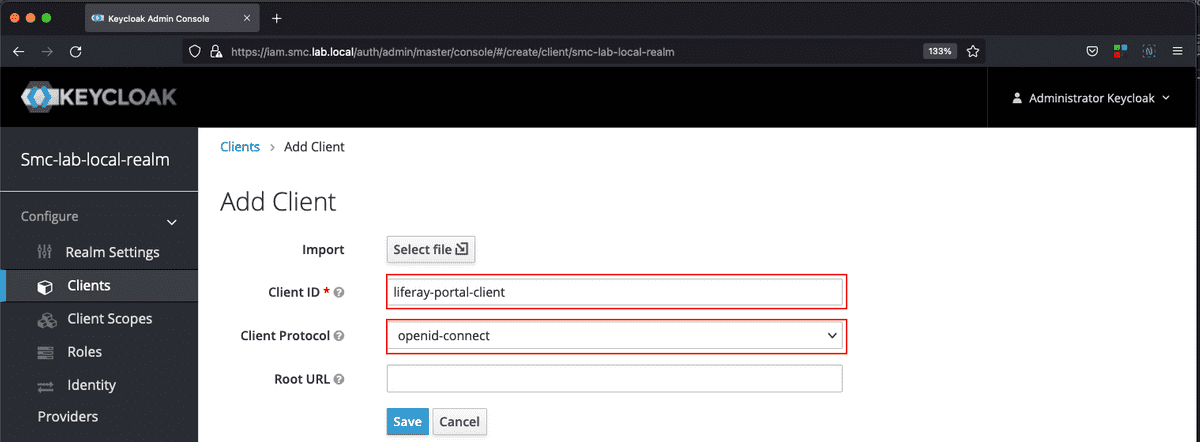
The second step requires the creation of a new OpenID Connect client. The data essential to be able to create the client are indicated below.
- Client ID: unique identifier of the client.
- Name: description of the client.
- Access Type: type of access that in this case must be set to confidentials.
- Valid Redirect URIs: list of redirect URIs that must be considered valid by Keycloak.
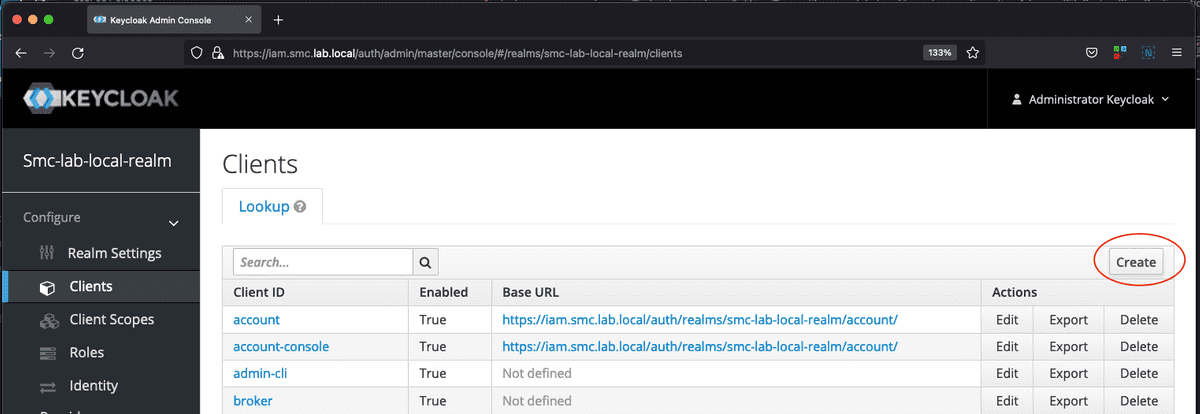
To start the creation of the new client, from the Configure section of the Realm, select the Clients item and then click on the Create button. The figures below show the new client creation masks.
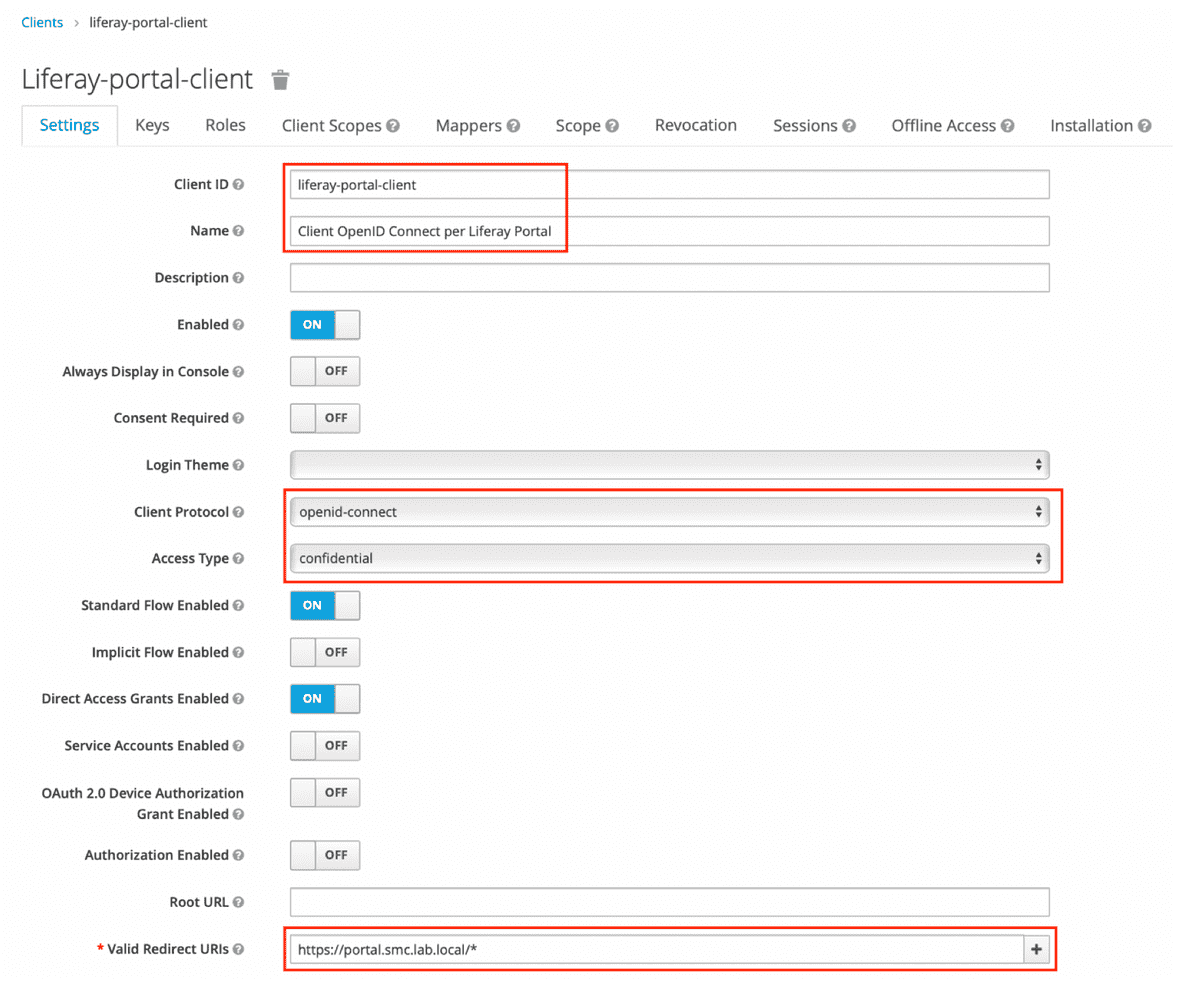
The parameters and values indicated in the table below are the ones that must be set on the client configuration modification mask (see the figure below). A good rule of thumb is to assign a value “talking” or self-explanatory to the Client ID parameter.
| Parameter | Value |
|---|---|
| Client ID | liferay-portal-client |
| Name | Client OpenID Connect per Liferay Portal |
| Access Type | confidentials |
| Valid Redirect URIs | https://portal.smc.lab.local/* |
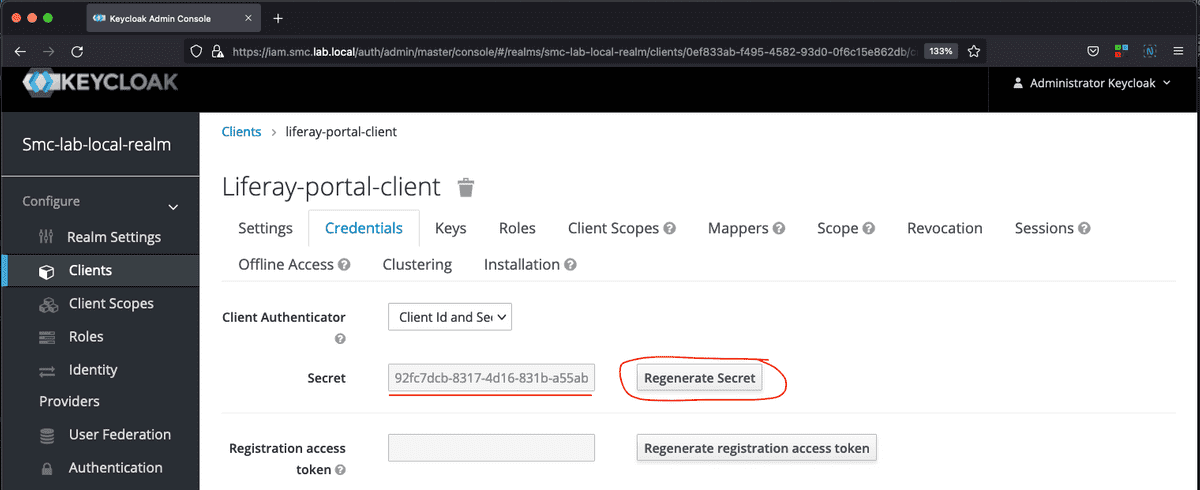
After saving the client configuration, go to the Credentials tab subsequently clicking on the Regenerate Secret button, taking note of the Secret just generated, this value will be useful in the next one configuration of the Identity Provider.
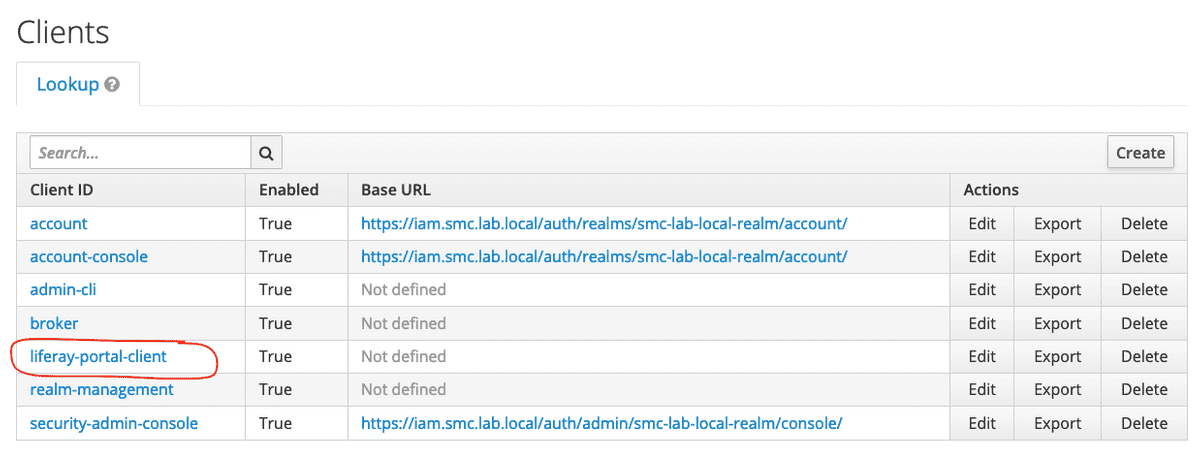
Now among the list of clients registered on Keycloak the one just is available created for integration with the Liferay portal (see figure below).
2.3 - Configurazione Identity Provider
The third step requires the configuration of the OpenID Connect Identity Provider. The essential data to be able to create the client are indicated below.
- Unique alias to be assigned to the Identity Provider
- Authorization URL
- Token URL
- Logout URL
- Client Authentication
- Client ID
- Secret
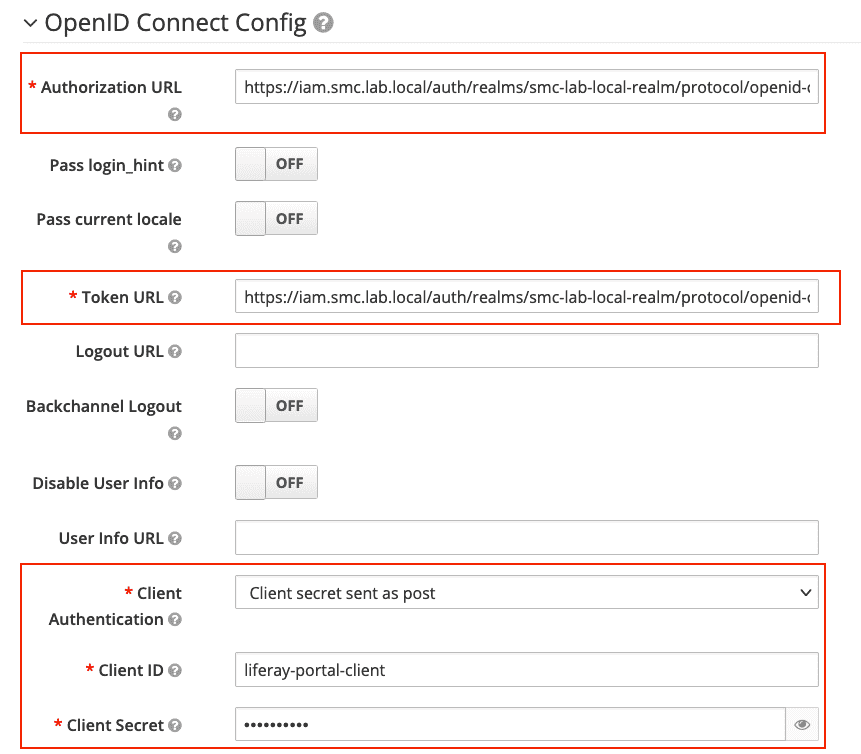
The values concerning Authorization, Token and Logout URL can be extracted from the OpenID Connect Endpoint (configuration metadata) shown above.
The values concerning Client ID and Secret are those set previously when creating the client.
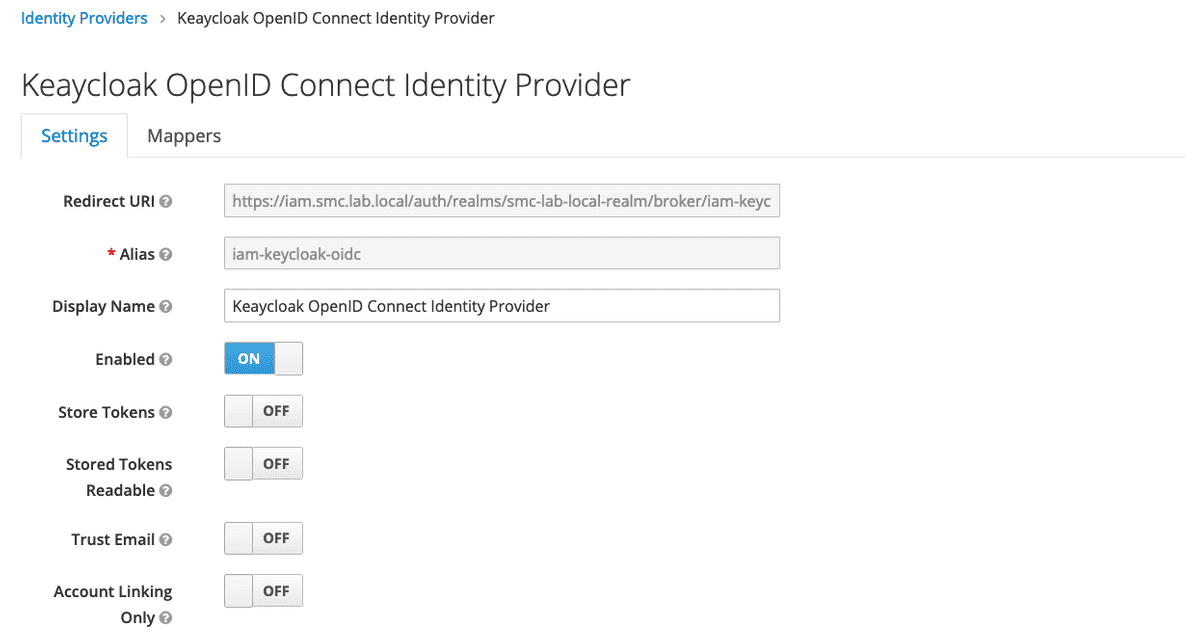
To start the creation of the Identity Provider, from the Configure section of the Realm select the Identity Providers item and then select from the list the Keycloak OpenID Connect element. The following figures show the masks of creation of the new client.
The table below shows the parameters and their respective values that must be set on the new Identity Provider creation mask.
| Parameter | Value |
|---|---|
| Authorization URL | https://iam.smc.lab.local/auth/realms/smc-lab-local-realm/protocol/openid-connect/auth |
| Token URL | https://iam.smc.lab.local/auth/realms/smc-lab-local-realm/protocol/openid-connect/token |
| Logout URL | https://iam.smc.lab.local/auth/realms/smc-lab-local-realm/protocol/openid-connect/logout |
| Client ID | liferay-portal-client |
| Secret | 8562bd93-8ccd-4426-bf7a-681ac9e38a32 |
| Alias | iam-keycloak-oidc |
The two figures below show the configurations that have been applied to the new Identity Provider OpenID Connect with the values indicated by the previous one table.
2.4 - Configuration of utilities
For users to be able to log in, they must be configured on Keycloak. To do this, you can, for example, configure an LDAP directory service or manually enter some user just for the purpose of test.
For this operation, please refer to the official Keycloak documentation where it is you can retrieve all the necessary information on User Management and User Storage Federation, useful features for user management and storage mechanisms.
3 - Liferay configuration
Once the configuration of the Keycloak instance has been completed OpenID Connect, Liferay must be configured to support authentication via OpenID Connect.
Liferay offers built-in support for SSO systems and OpenID Connect falls between these. You can add multiple OpenID Connection configurations Provider.
We therefore assume that the Liferay portal instance is operational and access the admin panel using admin credentials. Let's assume that the Liferay instance is available at https://portal.smc.lab.local
For any further information on configuring OpenID Connect on Liferay (both CE and DXP), please refer to the official documentation Authenticating with OpenID Connect.
3.1 - Configure OpenID Connect
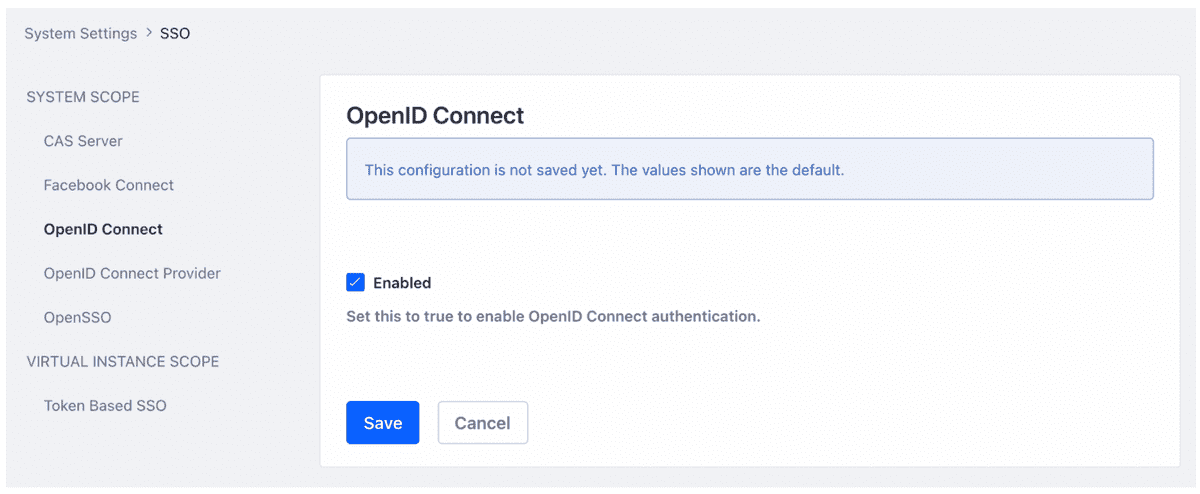
The first configuration step concerns the enabling of OpenID Connect, the the second step concerns the configuration of OpenID Connect and in particular of the Provider.
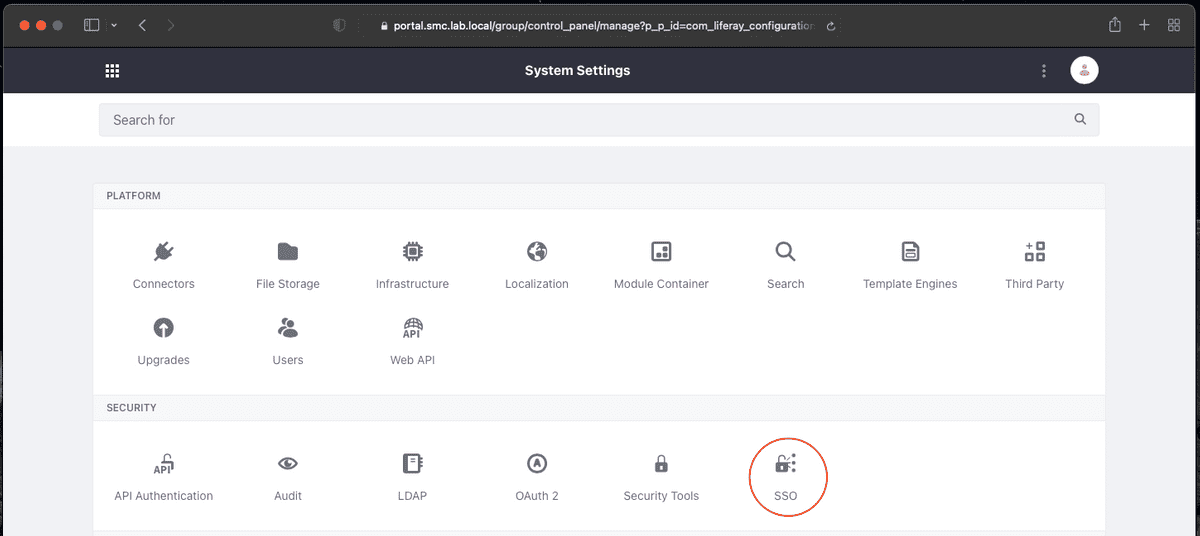
To enable OpenID Connect, simply go to Control Panel => System Settings => SSO => OpenID Connect, check Enabled and save the configuration (see the two figures below).
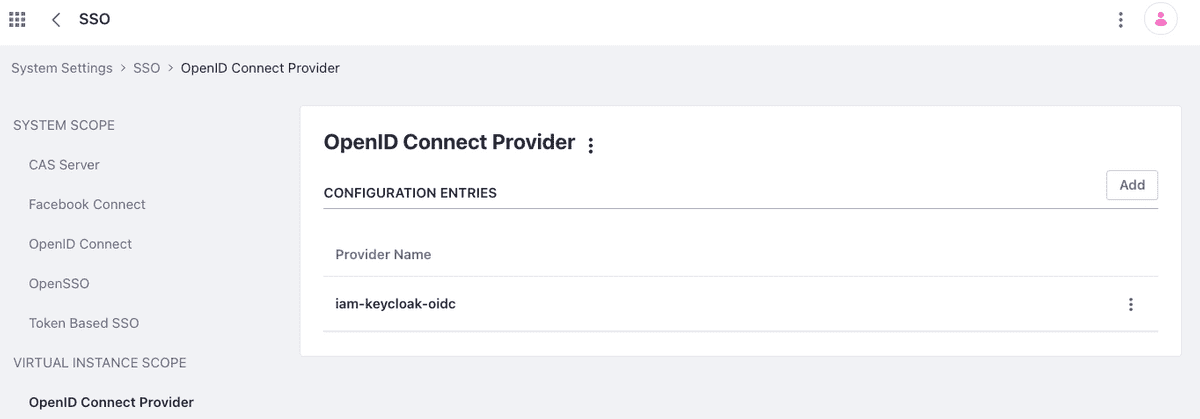
At this point, you need to move to the OpenID Connect Provider tab to insert all configuration parameters concerning the Identity service Provider (OpenID Connect) previously configured on Keycloak.
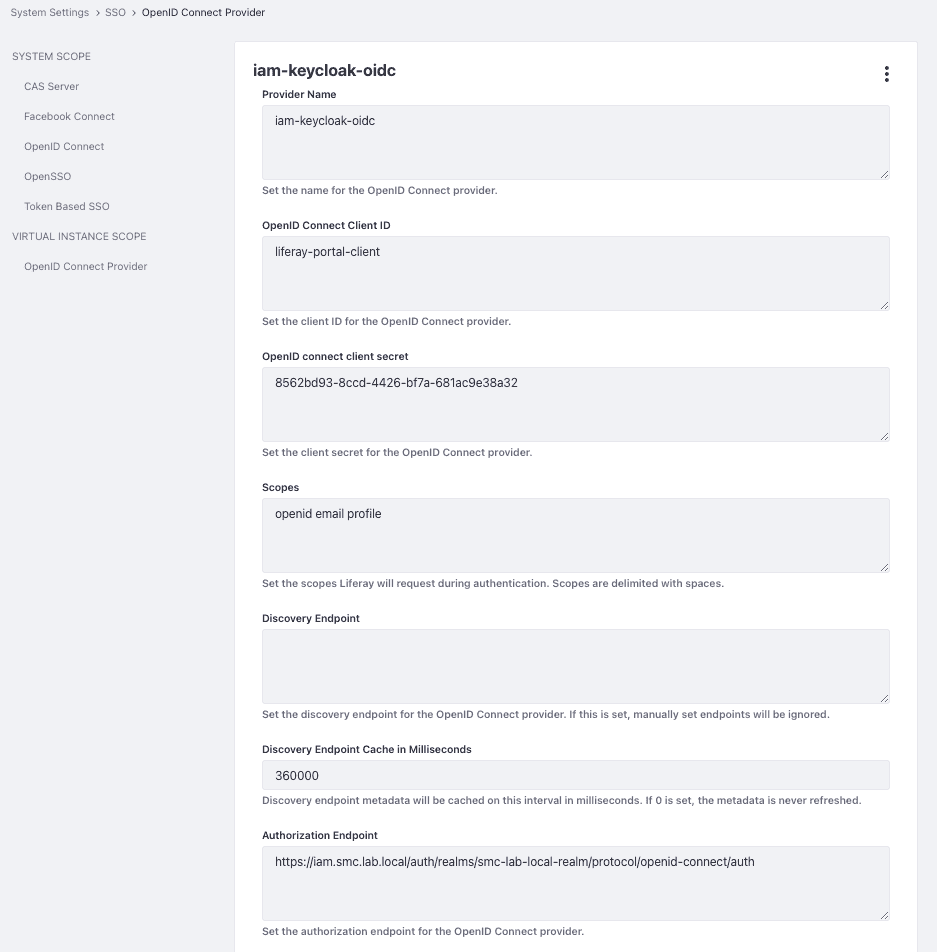
| Parameter | Value |
|---|---|
| Provider Name | iam-keycloak-oidc |
| OpenID Connect Client ID | liferay-portal-client |
| OpenID connect client secret | 8562bd93-8ccd-4426-bf7a-681ac9e38a32 |
| Authorization Endpoint | https://iam.smc.lab.local/auth/realms/smc-lab-local-realm/protocol/openid-connect/auth |
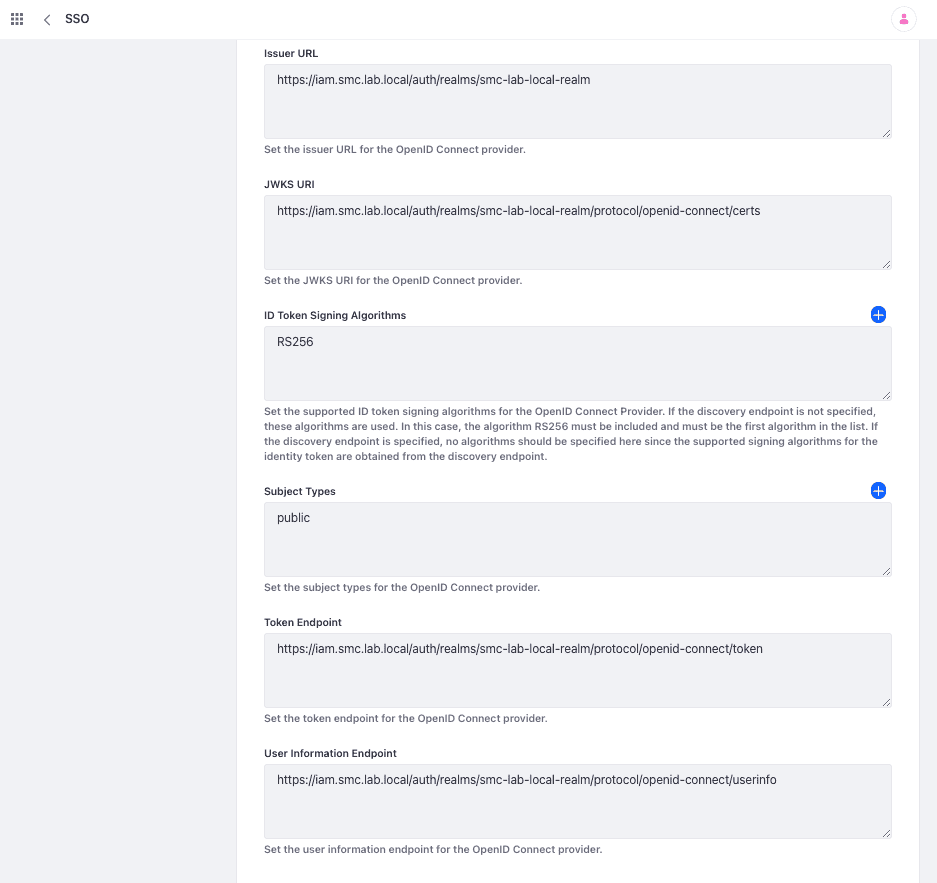
| Issuer URL | https://iam.smc.lab.local/auth/realms/smc-lab-local-realm |
| JWKS URI | https://iam.smc.lab.local/auth/realms/smc-lab-local-realm/protocol/openid-connect/certs |
| Subject Type | public |
| Token Endpoint | https://iam.smc.lab.local/auth/realms/smc-lab-local-realm/protocol/openid-connect/token |
| User Information Endpoint | https://iam.smc.lab.local/auth/realms/smc-lab-local-realm/protocol/openid-connect/userinfo |
The two figures below (15 A and 16 B) show the configuration mask of the OpenID Connect Provider which reports the configuration parameters as well as indicated in the previous table.
At this point the configuration of OpenID Connect on Liferay is finished. You can then proceed with an access test.
4 - Access to Liferay
The Liferay portal can now be accessed using the OpenID protocol Connect and test the correct configuration in this way.
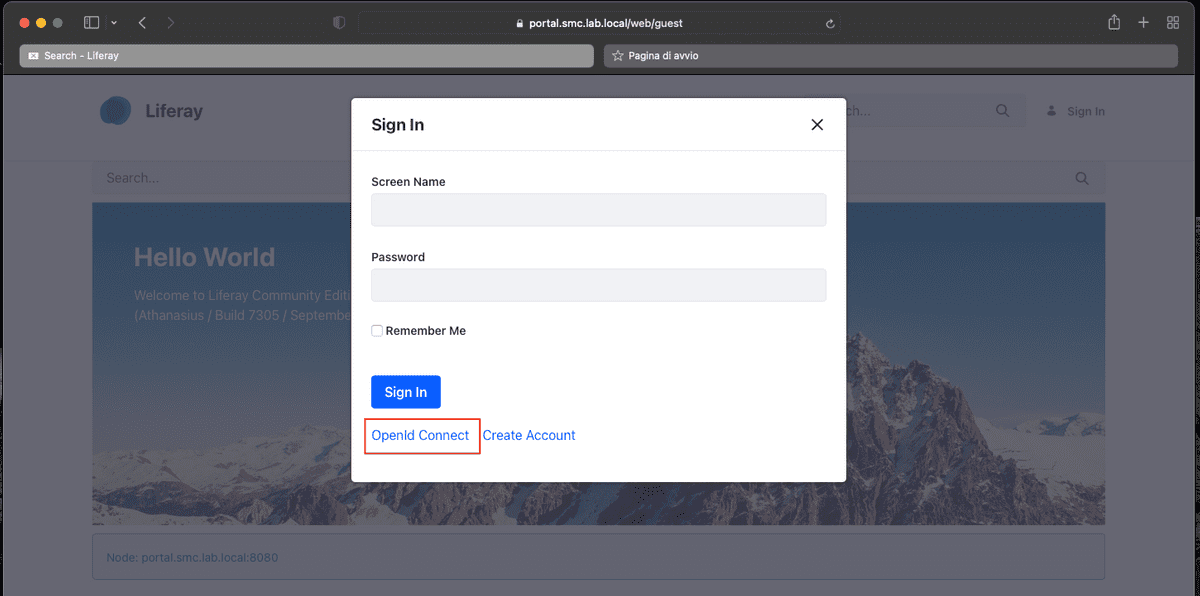
From the moment that OpenID Connect is activated, the standard Login portlet of Liferay displays the login link via OpenID Connect, as shown by the figure to follow.
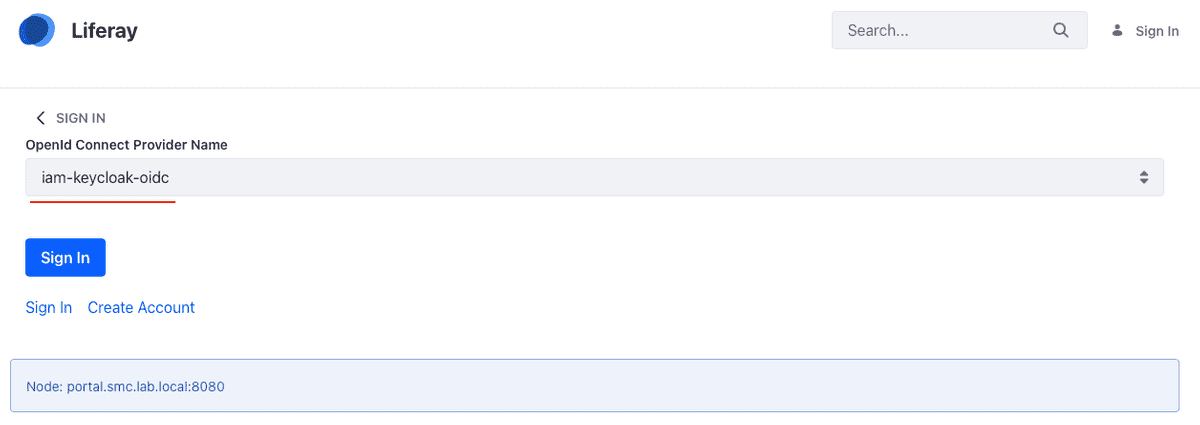
When the user clicks on the OpenID Connect link, this is redirected to the page from where the user can select the authentication provider (see figure below). You can have multiple authentication providers, that's it the reason why the choice is given. In our case we have a only provider which is called iam-keycloak-oidc, the name assigned at time configuration.
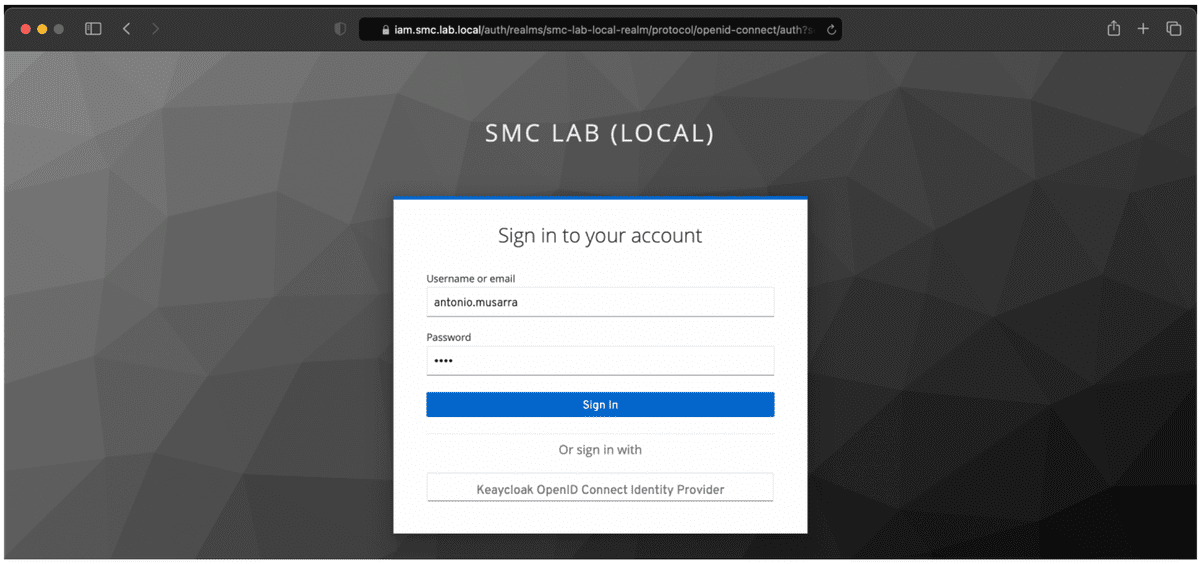
Once you have selected the provider and clicked on the Sign In button, Liferay sends the user back to the Keycloak Login page (and in particular of the Realm created earlier).
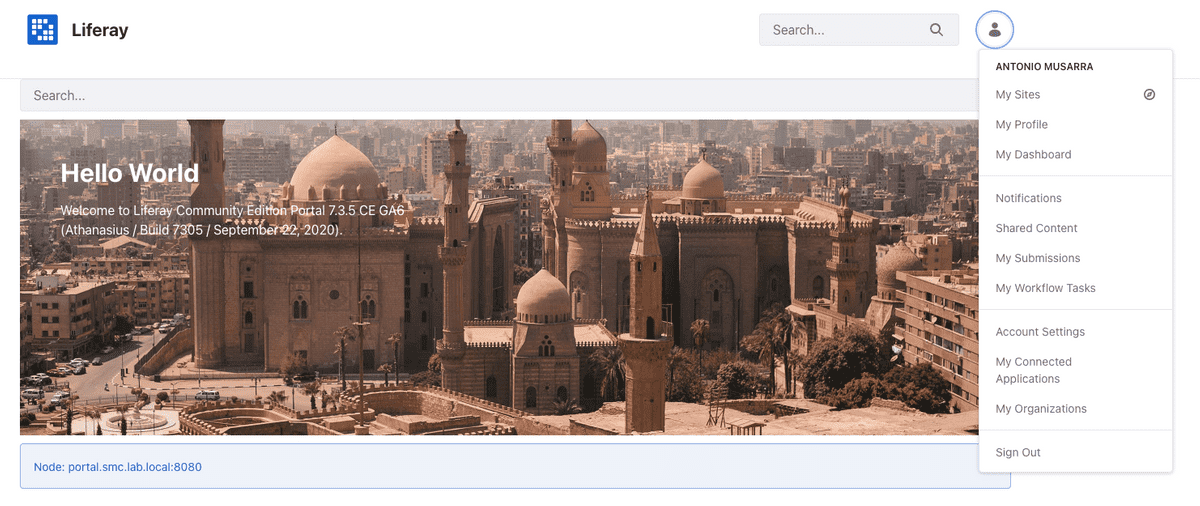
On the login page, enter valid login credentials (for example of a user defined on LDAP or locally to Keycloak). If the credentials entered are correct, then the user will be redirected to the home page of the Liferay portal. If the user is not present on Liferay, this will be created using the information obtained from the Identity Provider (Keycloak).
The figures below show the Liferay portal with the user just logged in and the active sessions on Keycloak for the OpenID Connect client dedicated to Liferay.
5 - Single Logout (SLO) implementation
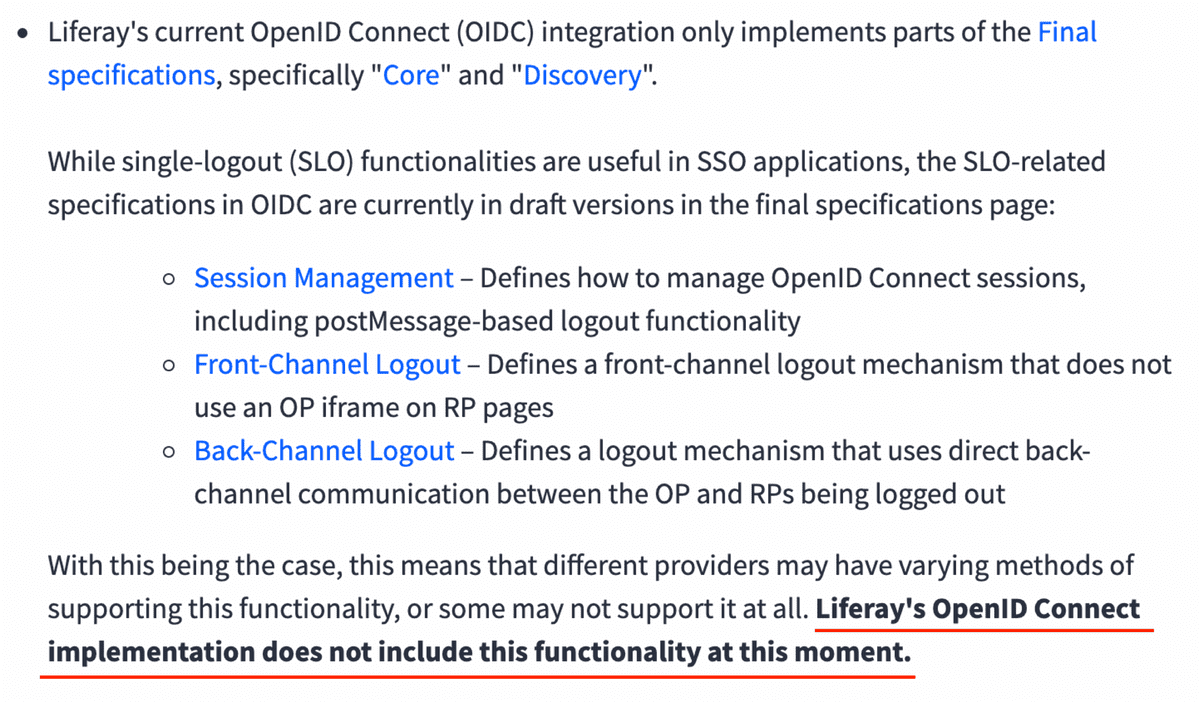
The built-in implementation of OpenID Connect on Liferay version 7.3 does not supports the functionality of SLO or Single Logout, this means that when a user is disconnected from Liferay (logout operation or session expired), this is not automatically disconnected from Keycloak, with the consequence that a new access will not require the user credentials to be entered on Keycloak (if the session is still active).
This situation is clearly reported on the Knowledge Base under the name of Liferay's OpenID Connect implementation and Single Logout (see excerpt in figure below). However, SLO can be implemented with a post action custom logout.
6 - Il bonus
I imagine having a Docker Compose availability with all services configure that implements the scenario described, it is a nice bonus; are you of the same idea?
The keycloak-openid-connect-liferay project published on the GitHub repository of SMC, contains the Docker Compose and all configurations that we have seen in the course of this article.
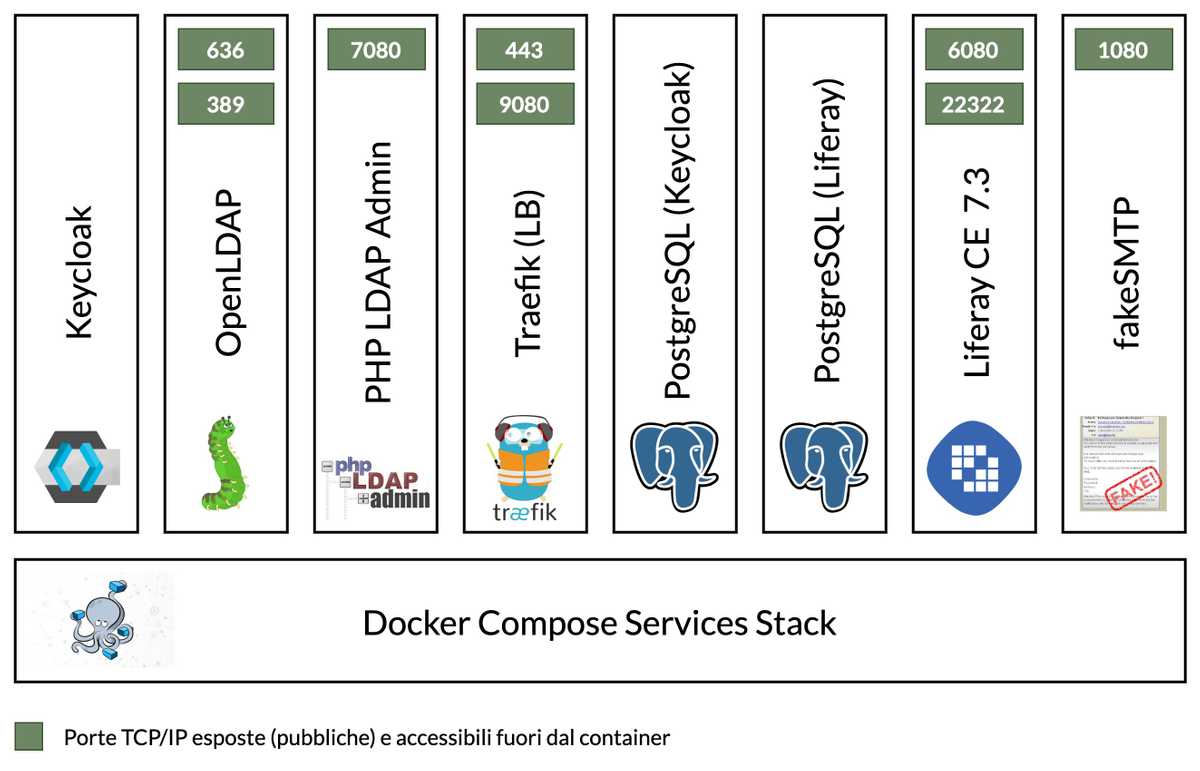
The services that make up the stack are listed below.
- Keycloak
- OpenLDAP (implementation of the LDAP service for the user store)
- PHP LDAP Admin (LDAP administration interface)
- PostgreSQL (database for Keycloak and Liferay)
- Liferay
- fakeSMTP (service for sending email)
- Traefik (Load Balancer)
The essential services are: Traefik, Keycloak, OpenLDAP, PostgreSQL and Liferay. The figure below shows the diagram summarizing the complete stack.
The Keycloak and Liferay portal services are configured to be accessible through Traefik on the https port and on the respective FQDNs indicated below:
The steps needed to run the entire stack are:
- Check the Docker version (Docker Engine 20.10.x, Docker Compose 2.0.x)
- Clone the keycloak-openid-connect-liferay repository
- Update the hosts file (of the host machine) with the entries for Keycloak and Liferay
- Starting the stack via Docker Compose
Regarding the Docker version, we made use of Docker for this article Desktop for macOS version 4.1.0 (which includes Docker Engine 20.10.8 and Docker Compose 2.0.0).
I still ran a test using Docker on Linux. Same version of Docker used on macOS but with a lower Docker Compose version, that is, 1.28.6. I didn't encounter any problems, the services stack was fine pulled up.
I was unable to test on Windows; I leave it to some of you to run this proof.
# Step 1 - Check Docker version
$ docker version
$ docker-compose version

# Step 2 - Clone the project git repository
$ git clone https://github.com/smclab/keycloak-openid-connect-liferay.git

# Step 3 - Update the /etc/hosts with this content
127.0.0.1   iam.smc.lab.local
127.0.0.1   portal.smc.lab.local

# Step 4 - Start the Docker Compose stack services
$ docker-compose --env-file env/development.env upThe time it takes for the services to be all operational varies and depends largely from the availability of the resources of the machine it is on Docker execution and how many of these have been assigned to Docker itself.
In this specific case I have assigned the following resources to Docker: CPUx2, 8GByte of RAM memory, 1GByte of Swap and 10GByte of storage. These are the resources minimum to have a "usable" environment. I ran a test with 6GBytes of RAM memory, the stack "holds up" even if it works with difficulty.
To give you an idea of the star-up times (excluding image pull times), on my MacBook Pro 2.5 GHz Intel Core i7 dual-core, 16 GB 2133 MHz LPDDR3, the star-up time is about six minutes, for the first start, time that goes down about 3.5 minutes from the second start.
The start-up times on my Linux Workstation they are decidedly inferior. The first start 1.15 minutes, from the second start onwards 1.02 minutes.
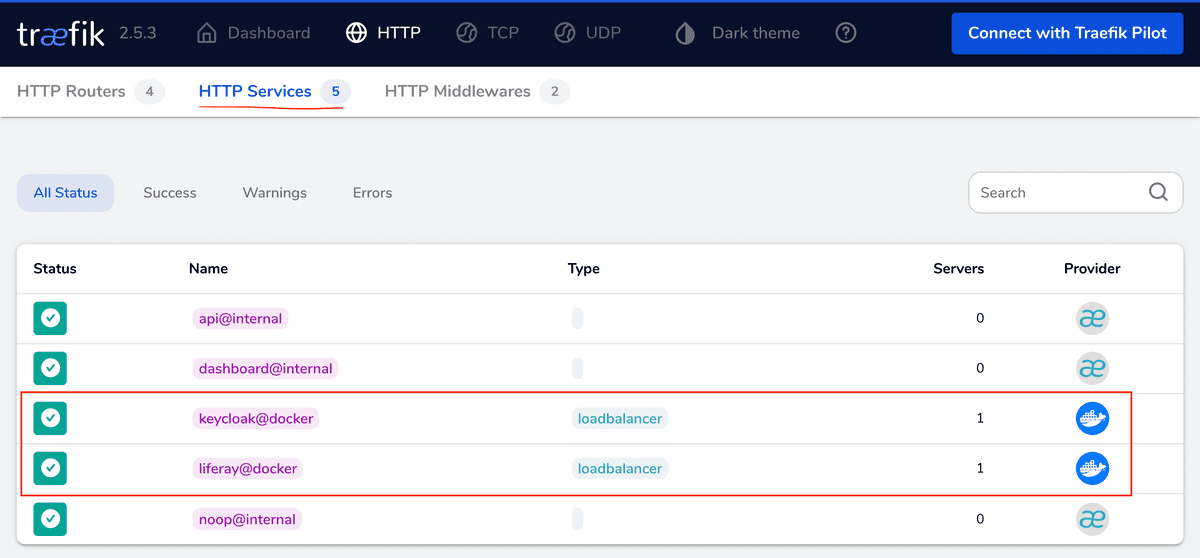
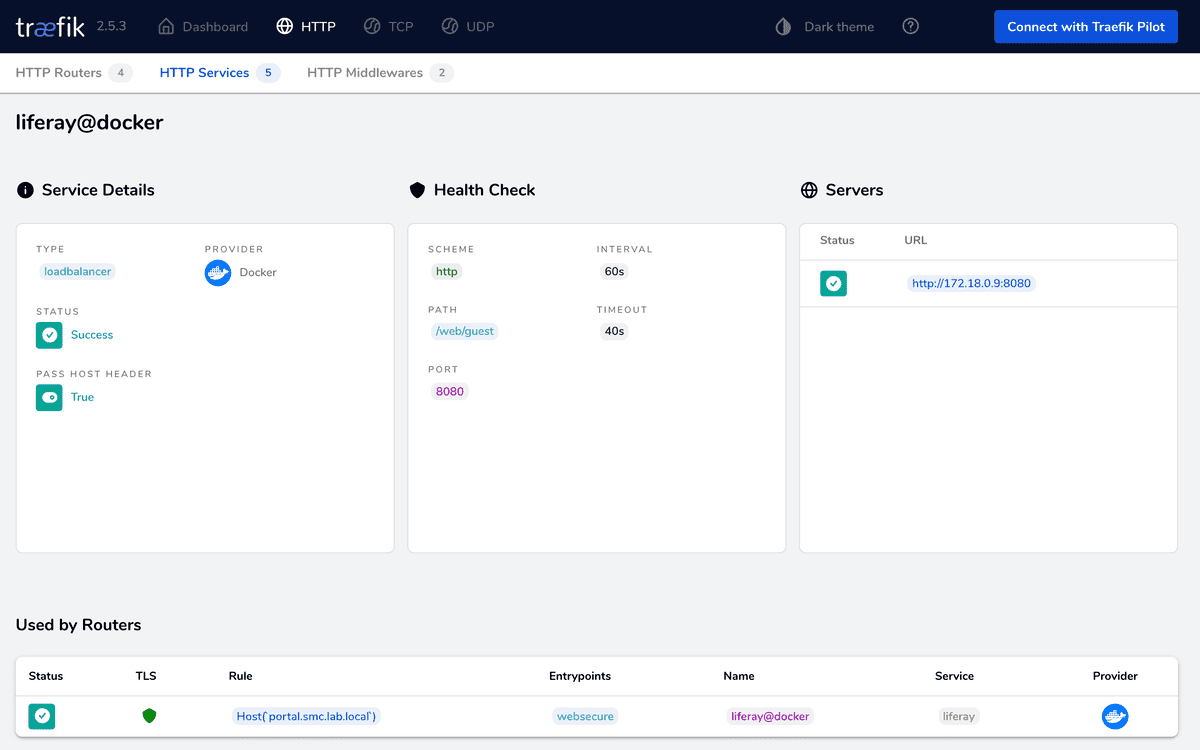
Once the services are all up, the environment is ready to be configured as we have seen in the course of this article. A quick way to checking that the services of our interest are on, is to connect to the Traefik console at http://localhost:9080/dashboard. The figures a follow shows the status of Keycloak and Liferay services.
The access credentials for the various services are indicated below:
- Keycloak (login credentials to the administration console): admin/Pa55w0rd
- Liferay (login credentials as administrator): test/test
- LDAP (login credentials as administrator): cn=admin,dc=smc,dc=local/admin
- LDAP (read-only login credentials): cn=readonly,dc=smc,dc=local/readonly
The LDAP Data Interchange Format file config/ldap/bootstrap.ldif (available on the repository) contains the entire directory structure of the LDAP service. The password for all users is: test.
Liferay Configuration Tips: You should notice that the Liferay portal results already configured for the OpenID Connect part, the only thing to review is the client secret (generated on Keycloak) that you should update.
Keycloak Configuration Tips: Keycloak does not appear to be configured, you should arrange to do so as described in the article, or, you could load the configuration from the json file [realm-export-smc-lab-local-realm.json](https://github.com/smclab/keycloak-openid-connect-liferay/blob/master/config/keycloak/export /realm-export-smc-lab-local-realm.json) available within the repository (config/keycloak/export directory). In case of the second option, remember that you should then regenerate the client secret and re-enter the login password for the LDAP service.
7 - Conclusions
Welcome to the end! For beings who have come to the end of reading this article, I'm pretty sure you've just found yourself in the situation described or that you are about to have to undertake this activity.
I have found myself several times in this situation, and the path I wanted to indicate with this article it is the one that I consider most advantageous, especially in terms of effort.
How did you approach this issue? Let's discuss it together.
